Getting enough sleep is maybe the most crucial aspect of your health. The body grows, regenerates, and repairs throughout this time. It’s also quite simple to keep up an ideal schedule once you’ve established it.
Using advanced techniques to optimize your sleep cycle enables enhanced cognitive function and physical recovery.
This blog aims to equip viewers with actionable strategies for improved daily performance through better sleep.
Do You Feel Energized?
Are you *really* getting the most out of your sleep? Imagine waking up every day feeling 100% optimized, not just rested. We’re diving into the future of sleep tracking with AI, revealing how personalized data can unlock peak daily performance.
The Hidden Cost of Poor Sleep
Chronic sleep deprivation silently erodes focus, mood, and long-term health. And it goes beyond fatigue. It impacts on decision-making, creativity, and immunity.
Good sleep is essential for overall health and optimal functioning. Scientific research shows that quality sleep helps the body and brain repair and rejuvenate.
When we sleep, the brain consolidates memories and processes information, which sharpens focus and enhances decision-making skills. Sleep also plays a vital role in regulating mood by balancing neurotransmitters and stress hormones.
Without sufficient rest, individuals may experience irritability, anxiety, and increased susceptibility to mental health issues.
Moreover, sleep is crucial for the immune system. During deep sleep stages, the body produces cytokines, proteins that help fight infections and inflammation.
Chronic sleep deprivation weakens immune response, making it harder for the body to defend itself against illnesses. It also negatively affects long-term health by increasing the risk of chronic conditions such as diabetes, heart disease, and obesity.
Beyond fatigue, lack of quality sleep impairs creativity, decision-making, and the ability to focus, undermining performance in daily and professional tasks. This highlights that sleep is not merely a passive activity but a vital process for maintaining biological and psychological resilience.
Biohacking sleep—optimizing routines and environment—can significantly improve overall well-being and performance, underscoring that quality sleep is truly non-negotiable.
Quality sleep is non-negotiable for true peak performance. This isn’t just about getting enough sleep; it’s about biohacking your entire life.”
Decoding Your Sleep Blueprint
The easiest way to understand your sleep patterns is to leverage smart rings and watches or health bands (Link to blog, Watch vs. Health Band) to understand your unique sleep architecture (REM, deep sleep, wakefulness).
Discovering if you’re an early bird or a night owl and optimizing your schedule accordingly to fit your perfect sleep times will surprise you of the benefits it brings..
Adding an environmental audits and identifying hidden sleep disruptors in your bedroom , like light, temperature, or noise will help your quality of sleep.
If you are enjoying this video pleas hit the subscribe button as it helps me put these videos together.
Biohacking Your Nightly Rejuvenation
Using light therapy evolution and advanced strategies with red light and blue light blocking glasses are great for circadian rhythm synchronization.
And adding a nutritional nocturnal routine with the latest adaptogens, magnesium, and adding specific food times will increase your sleep optimization.
Check out my list of favorite Health Supplements at Benable.
Smart temperature regulation: Utilizing cooling mattresses and mattress toppers provide precise room temperatures for deeper sleep stages.
To kick start your days and aid your circadian reset rituals, start by getting out in the morning sunlight. This natural light helps regulate your internal clock, promoting alertness throughout the day.
Pair this with strategic hydration, such as drinking a glass of water upon waking, to stimulate your body and enhance immediate alertness. Try warm water with a slice of lemon first as this will help with the gut.
Incorporate nootropics like caffeine or natural alternatives to promote wakefulness during the morning. Additionally, using supplements such as L-Theanine and Rhodiola Rosea can provide sustained cognitive support, improving mental clarity and reducing fatigue over time.
Physical movement is also a key component. Engage in specific exercises like dynamic stretching, jumping jacks, or a brisk walk to activate your body. These activities increase blood flow, wake up your nervous system, and set a positive, energized tone for the day.
Incorporating these rituals can significantly enhance your natural circadian rhythm and boost your mental and physical performance from the moment you wake up.
Your Personalized Sleep Plan
So how do we make a unique sleep plan combining the most effective strategies into a personalized, actionable plan?.
Creating a unique sleep plan involves integrating the most effective strategies from bio-hacking, exercise, diet, and natural resources to suit individual needs.
First, assess your personal sleep patterns and environmental factors, such as light exposure and bedroom temperature.
Use bio-hacking techniques like targeted light exposure, ensuring bright natural light in the morning to reset your circadian rhythm, and minimizing blue light at night to promote melatonin production.
Incorporate exercise strategically, engaging in moderate physical activity during the day can improve sleep quality, but avoid intense workouts close to bedtime.
Nutrition also plays a critical role; consuming sleep-friendly foods like magnesium-rich snacks, and avoiding caffeine and heavy meals before bed, can enhance sleep onset and duration.
Utilize natural resources such as herbal teas like chamomile or passionflower, or incorporate relaxation techniques like meditation and deep breathing to calm the mind before sleep.
Customized routines might include wind-down rituals, maintaining a consistent schedule, and optimizing your sleep environment, dark, cool, and quiet.
By combining these elements, light management, movement, mindful eating, and natural remedies—you can develop a personalized, actionable sleep plan that enhances rest, recovery, and overall well-being.
Regularly refine the plan based on your progress and changing needs.
The power of routine and adaptability is the long-term “super strength” for sleep success. Consistency is King.
The frontier of sleep tech.
Glimpsing into the future of your bio-hacking journey may find you incorporating neurofeedback activities, sound therapy, and personalized sleep interventions.
You could also use AI to generate personalized sleep program interventions, and then utilize the AI program to adjust and adapt your plan based on daily changes.
In addition you could use the AI’s recommendations for diet, exercise timing, and wind-down and wake up routines. And link this to any smart technology you are using, like a watch or ring, to provide the data on sleep times, exercises and health reports..
One Step at a Time.
While the new horizons look great, being able to concentrate on the basics first will help you introduce and optimize your your sleep cycle faster.
Once you have introduced your sleep foundations you can introduce these ideas later if you wish.
Steve
Some links on this site may be affiliate links, and if you purchase something through these links, I will make a commission on them.
There will be no extra cost to you and, you could actually save money. Read our full affiliate disclosure here.
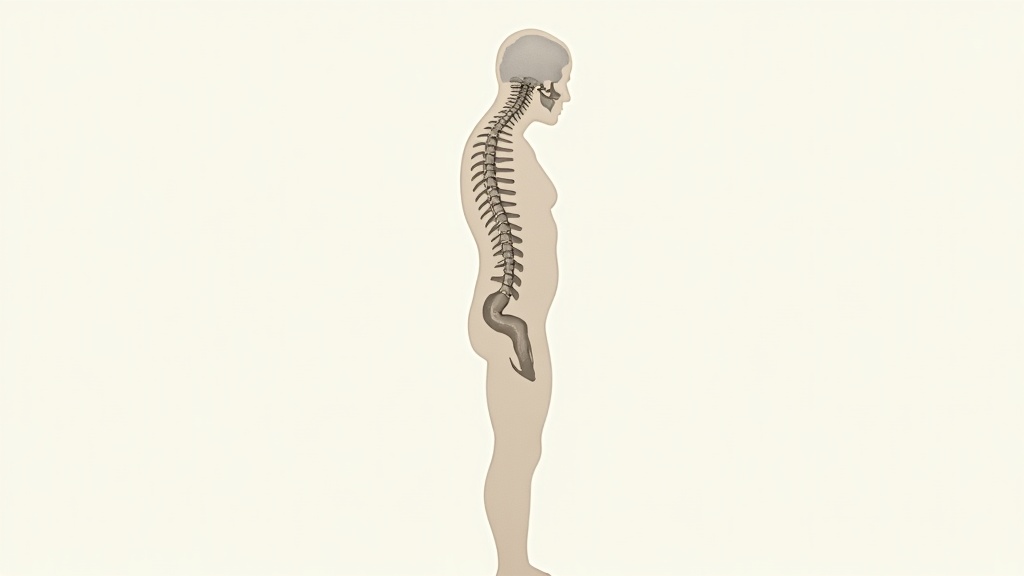
Poor posture can sneak up on just about anyone, especially if you spend a lot of time at a desk, on your phone, or binge-watching TV. While slumping in your chair or standing with rounded shoulders might feel comfy in the moment, the longer-term effects on your body and mind can add up fast.
There’s a lot more to posture than just looking confident. It shapes your health from head to toe, even in ways you might not notice right away. I’m going break down the hidden health risks of bad posture, how it really messes with you (even beyond an achy back), and practical things you can do to start moving and feeling better.
Warning Signs of Bad Posture
Bad posture isn’t always obvious at the start. You might catch yourself slouching or leaning over your keyboard now and then, but it’s usually the smaller signs that tell you something’s off. Here are a few early warning signs I’ve noticed (in myself and many others) that are pretty common:
Aching in your neck, back, or shoulders: That stiff, nagging pain at the end of a workday is a big clue.
Frequent headaches: Constant tension can creep from your shoulders right up into your scalp and temples.
Tiredness for no clear reason: Slouching forces your muscles to work harder, so you just get tired quicker.
Sore hips or knees: When your upper body isn’t balanced, your lower body picks up the slack.
Tingling or numbness in arms or legs: This can show up if nerves get pinched from constant poor alignment.
If any of these sound familiar, you’re definitely not alone. Catching these signs early helps you do something about them before they become bigger problems.
How Posture Affects Health Overall
Posture does a lot more than just keep you standing straight. It controls how your muscles, joints, and even internal organs function throughout the day. If you keep up bad habits like slumping or craning your neck forward, over time your body starts to compensate in unhealthy ways. Here’s how posture can mess with your overall health:
Your spine is basically the body’s highway for nerves. If you consistently hunch or twist it, you put pressure on nerves that control not just movement, but things like digestion, circulation, and breathing. This can spark inflammation or pain that keeps coming back.
Maintaining poor alignment also weakens your core muscles, which means they aren’t able to support your back properly. Over time, that strain can spread to muscles you didn’t even realize were working overtime. Think tight hips and sore knees. All this extra stress makes your joints wear out faster. If your joints get overused, it can lead to arthritis earlier in life, so it’s something to be aware of before it turns chronic.
Studies even show that people with poor posture experience more fatigue and mood swings, since constant discomfort can disrupt your sleep and impact your stress levels. (Here’s a Harvard Health resource on how posture ties into wellbeing.)
It’s worth noting that posture also plays a role in balance and falls, especially as we get older. When your center of gravity shifts forward or to one side, it throws off your stability, which can raise the risk of slips or injuries. Adjusting posture not only helps your body work better, but it also gives you some protection against everyday mishaps and bumps.
How Posture Affects Breathing
Good posture isn’t just about your back and shoulders. It really changes how you breathe. When you slouch, your chest collapses and your lungs don’t have the space they need to fully expand. I notice this after a long stretch of working at my laptop. My breaths get shorter, and I end up feeling winded even though I’ve barely moved.
Over time, shallow breathing affects how much oxygen gets to your brain and muscles. This can make you feel foggy, tired, and anxious. If you sing, play wind instruments, or do any athletic activity, bad posture can really drag down your performance. Focusing on sitting and standing up straighter gives your lungs and diaphragm way more room to do their job. It’s a quick fix you can feel right away. Try taking a deep breath in while slouching, then while sitting up. It’s a night and day difference.
The diaphragm especially gets boxed in by a collapsed chest or rounded back, so lifting your chest gently opens up more oxygen flow. Over weeks and months, you may notice you have more stamina in everyday life, just from giving your lungs a bit more room on a regular basis. If you want a simple habit, try a few rounds of deep breathing every hour to reset your posture and your focus.
How Posture Affects Sleeping
Ever wake up sore after what seemed like a good night’s sleep? Bad posture can follow you to bed, too. If your spine stays out of alignment all day, those same patterns show up when you sleep. You might toss and turn more, wake up with neck or lower back pain, or even get tingling in your arms and legs.
Pillow and mattress support matter, but the real issue starts with how your body lines up before you even hit the sheets. If you watch TV or scroll your phone with your neck propped awkwardly, it sets up your muscles for a rough night. I’ve found that stretching before bed and paying attention to how my body feels can make a big difference in sleep quality. Mayo Clinic has some good tips on healthy sleep positioning that are worth checking out.
For those who sleep on their side, make sure your pillow keeps your neck about level with your spine and try putting a small pillow between your knees. If you’re a back sleeper, a small pillow under your knees helps take pressure off your lower back. These tweaks, along with general posture awareness during the day, can lead to more restful sleep and less soreness when you wake up.
How Posture Affects Exercise
Working out with poor posture basically puts you on the fast track to injury. I’ve seen this often at gyms—people do squats or deadlifts with rounded shoulders or arched backs, which puts a ton of stress on their spine and joints. It also limits the muscles you’re supposed to be working, so you don’t get the full benefits from your sweat session.
Good alignment lets you engage your core, keep proper form, and spread the load across your muscles instead of just one or two. This means better performance, more power, and way less risk of tweaking something. If you’re starting a new workout, it helps to check your posture in a mirror or ask a friend (or trainer) to spot you. Small adjustments in how you stand, grip, or squat pay off fast. Trust me!
If you love running or cycling, taking the time to check your posture can help prevent repetitive strain injuries and even step up your endurance. If you’re an athlete or just exercise a few times a week, taking posture seriously is like a secret weapon for your joints and muscles.
How Posture Affects Digestion and Internal Pain
This one catches a lot of people by surprise. If you’re sitting hunched over a desk or curled up after lunch, you put pressure on your internal organs. That cramped space slows food moving through your digestive tract, which can lead to bloating, constipation, or acid reflux. The connection between posture and gut health isn’t just something nutritionists talk about. Doctors see it in patients daily.
Back pain and internal aches often go together when posture is an issue. The nerves in your spine that help your organs do their job can get compressed, making pain and discomfort worse. I’ve heard from people who thought they had only “digestive issues,” but their problems started improving after working on their posture and movement habits.
Maintaining an upright position after eating, even just for a few minutes, helps your digestive system do its job. Try standing up and taking a gentle walk instead of sinking into the couch after meals—it can gently give a boost to how your whole gut operates.
How Posture Affects Self-Esteem
Slumping or keeping your shoulders rounded can really impact how you feel about yourself, especially over time. It might sound strange, but your body language feeds back into your mood and self-image. Standing tall and keeping your shoulders open can help boost confidence and make you feel more positive. I catch myself feeling down or stressed and realize my body is caved in. It’s a quick reality check to stand up straighter and reset my mind.
Some studies suggest that just two minutes in a more upright, open posture can lift your mood and help with feelings of social anxiety. It’s not some magic fix, but it’s an easy thing to experiment with the next time you feel a little off.
If you find yourself feeling self-conscious during public speaking or group situations, setting your shoulders back can help with both voice projection and a sense of control. Small body adjustments really can shape your mindset.
How to Overcome Bad Posture with Exercise, Yoga, Tai Chi and Medical Products
There’s good news: posture is totally fixable with a bit of patience and some new habits. I’ve tried out a mix of traditional exercises, yoga, and tai chi to keep things interesting and target different muscle groups. Regular exercise like walking or swimming helps strengthen your back, hips, and core. These are super important for holding good alignment throughout the day.
Yoga: Styles like Hatha or Iyengar focus on precise alignment while you stretch and strengthen. Poses like Mountain, Cobra, and Child’s Pose are really helpful for opening up stiff areas.
Tai Chi: With its slow, deliberate movements, tai-chi helps with body awareness, balance, and control. It’s gentle and approachable, so you don’t need to be in top shape to get started.
Traditional Strength Training:Core exercises, resistance band routines, and Pilates all help build stability and endurance in the muscles that keep your spine in place.
Medical Products: Ergonomic chairs, lumbar supports, and posture correcting devices can remind you to sit up straighter, but they work best when paired with stretching and strengthening. Some people benefit from working with a physical therapist or chiropractor for extra guidance tailored to their needs.
Mixing up these strategies is usually more effective than picking just one. If you stick with it, you’ll probably notice less pain, better movement, and even a little extra pep in your step. Plus, fixing your posture now is a solid investment in your future health. It’s never too late to give your spine a little love!
Adding mini posture checks throughout your day can help. Set a reminder on your phone, or use natural transitions like standing up for a cup of water or walking to another room. Over time, these micro habits can retrain your muscles and your attention, so good posture feels more natural and less like a chore.
Frequently Asked Questions
Question: Can fixing my posture reverse old aches and pains? Answer: Improving your posture can often decrease or even get rid of old pain, but it depends on what’s causing the issue. Strengthening key muscles and correcting daily habits usually make a difference in a few weeks.
Question: Is it possible to improve posture if I’ve had bad habits for years? Answer: Absolutely. You might have to work a bit harder to retrain your muscles, but posture can be adjusted at any age. Small changes over time make a real difference.
Question: Do posture braces really help? Answer: Posture braces can give you a gentle nudge to sit up straighter, but they’re not a fix on their own. Use them alongside exercises and stretches for the best results.
Final Thoughts
Working on your posture isn’t about chasing perfect alignment. It’s about noticing how you move, how you feel, and making simple tweaks wherever you can.
Investing just a few minutes a day to stretch, move, or check your posture pays off big-time over the years. Your body—and your mind—will thank you for it down the road.
Practicing Tai Chi after turning 50 has been a real game changer for me. This gentle form of exercise, rooted in ancient Chinese tradition, delivers real-world physical, mental, and social benefits. It is especially helpful for those of us looking for an activity that’s welcoming and effective. I want to share how Tai Chi meets the needs of people over 50, clear up common concerns, and guide you on getting the most out of this mindful movement.
Why Tai Chi Works So Well for the Over 50s
Tai Chi is a smooth, low impact form of movement that pairs balance, breathing, and mindful focus. While it used to be a niche interest, Tai Chi is now recommended by many doctors as a way to support active aging. I hear so many people say things like “I’m too stiff” or “I’m worried about falling.” Tai Chi actually helps with both of these issues because its movements promote flexibility and help with stability.
Studies from organizations like the National Center for Complementary and Integrative Health show that Tai Chi can reduce the risk of falls, ease anxiety, and help control blood pressure. Because it’s gentle and noncompetitive, it appeals to those who want to stay active, without high impact workouts or intimidating routines. For over 50s, this means you don’t need to be an athlete to experience the perks.
Getting Started with Tai Chi After 50
The idea of starting something new later in life can feel a bit daunting. The good news here is you don’t need fancy equipment or prior experience. Tai Chi classes are meant for all skill levels and nearly all physical abilities. You’ll often find classes at community centers, local gyms, parks, or even online, and there are friendly groups welcoming newcomers everywhere. Some people join dedicated Tai Chi studios, but you don’t need a formal setting to benefit—you can still gain a lot from online resources or informal groups in your area.
If you’re feeling unsure, here are a few things that often help:
Start with a Beginner Group: Classes labeled as “beginners” or “for seniors” take everything at a slow pace, break down every movement, and welcome questions. Instructors will show patience as everyone learns.
Wear Comfortable Clothing: Loose clothing and supportive sneakers or no shoes at all are perfect. There’s no dress code to stress over, just comfort and movement.
Listen to Your Body: Go at your own pace, and never push past what feels right for you. Tai Chi is about gentle progress, not competition or comparison.
If you can’t access in-person groups, YouTube has free guided routines designed for older adults, so you can practice in your living room. There are even DVD courses for those who prefer offline materials, and some local libraries offer lending options for Tai Chi instructional videos.
Easy Steps to Begin Your Tai Chi Adventure
Getting set up for Tai Chi is straightforward. Here’s my step-by-step guide based on what worked for me:
Find a Class or Video: Search for local classes with good reviews or check online for teachers who focus on practice for the over 50s. The right teacher will help you feel welcomed and make things easy to follow.
Pick a Time That Works: Commit to a regular slot for practice, whether it’s a live class or your own time at home. Setting reminders or pairing practice with another daily habit can really make it stick.
Practice Simple Warm-Ups: Gentle arm circles, toe touches, and a few minutes of mindful breathing help you settle in and prevent injuries. Taking a few deep breaths centers you before jumping in.
Start with Basic Forms: Forms like “Grasp the Bird’s Tail” or “Wave Hands Like Clouds” are easy to learn and good for building confidence. Mastering basics pays off as you progress.
Grasp the Birds Tail
Wave hands like clouds
Build : Even 10 to 15 minutes a day, three times a week, can have a big impact on mood, energy, and balance. Habits grow with gentle persistence.
I’ve found that writing down a practice schedule in my calendar keeps me motivated. If your schedule varies a lot, just do what you can, every bit of movement counts. Flexibility with timing beats skipping practice altogether, and small steps do add up over time.
Common Challenges and Smart Solutions for Older Adults
Lifestyle changes at 50 and beyond mean some common hurdles pop up with new exercise routines. Here are some typical concerns along with practical ways to overcome them:
Joint Pain or Physical Limitations: Tai Chi is naturally joint-friendly, but you can always modify movements or do them seated. Tell your instructor if you have arthritis, knee issues, or past injuries so they can offer tweaks.
Worry About Coordination: Tai Chi encourages slow, repetitive movements that help improve coordination over time. Even if you start out feeling clumsy, patience pays off because repetition builds muscle memory.
Intimidation or Embarrassment: Classes for mature adults are welcoming and supportive. Most folks are there for the same reason: to feel better and support each other along the way.
Memory Struggles: Repeating forms helps train both mind and body. Many over 50s, including me, notice big improvements in focus and recall with ongoing practice. Don’t hesitate to ask for a recap in class or use notes at home.
Most people notice real progress with patience and regular practice. If you feel doubts, stick with group classes as the camaraderie can boost confidence and make learning more enjoyable. Social support helps you stick with it, and sharing tips or jokes makes classes even better.
Adapting Tai Chi for Different Bodies
If you have mobility challenges, there are seated Tai Chi adaptations and routines tailored for chronic pain or limited range of motion. Experienced teachers can recommend alternative movements and suggest pacing so you stay comfortable. You may be surprised how much Tai Chi can be customized to fit personal circumstances, even if you’re recovering from surgery or have a chronic condition.
Making Tai Chi Part of Everyday Living
Tai Chi isn’t just an exercise class. It’s a set of skills you can take into your daily life. Here’s how it works for me and so many others in the over50 crowd:
Balance and Stability: Practicing weight shifting and mindful stepping helps you stay steady on your feet, reducing the fear of slips or falls. This confidence builds safety in everyday life.
Breath and Calm: Tai Chi’s deep breathing becomes a go to tool for dealing with stress at any time of day. These simple breathing techniques translate well to situations outside class, like sitting in traffic or prepping meals.
Social Time: Group lessons provide a chance to connect with others, swap stories, and make new friends, which is especially nice if you’re newly retired or living alone. Some groups even meet for tea or coffee after class, building connections beyond movement.
Many people say their mood lifts when Tai Chi becomes a regular habit. For me, it made mornings less stiff and afternoons less stressful. It’s a great way to get moving and reconnect with your body, no experience required. New friendships and routines can also help build a strong support network as the years roll by.
Helpful Tips to Boost Your Tai Chi Benefits
After the basics, there are some pretty handy ways to get even more out of Tai Chi. Here are my favorite strategies:
Practice Mindfully: Stay present while moving. Focus on your breathing and how your feet connect with the ground. This can boost feelings of relaxation and rejuvenation.
Create a Dedicated Space: Whether it’s in your living room or garden, having a familiar corner for Tai Chi helps create regularity and peace. Make your practice space a little oasis with plants or calming music if you like.
Keep Things Fun: Mix up routines, invite a partner to join, or try practicing outside in the fresh air. Small tweaks keep motivation up and routines from feeling stalled Mixing things up keeps your interest alive over months and years.
Journal Your Progress: It’s motivating to jot down physical changes, balance improvements, or mood boosts every week. Looking back on how far you’ve come can be really encouraging and give extra purpose to your routine.
Real-World Uses: Beyond the Tai Chi Studio
Tai Chi has practical benefits that you’ll notice outside of class. I’ve found it helps with everyday movements, like getting out of bed smoothly or reaching overhead safely. Those who practice for a few months often mention stronger legs, steadier posture, and better sleep. Here’s what you might notice:
Gardening and Walking: Improved strength and balance make yard work and nature walks more enjoyable.
Travel: If you love sightseeing but worry about long walks or stairs, Tai Chi’s impact on endurance and balance can be really helpful. Traveling feels smoother when your joints are more flexible and you tire less easily.
Household Tasks: Everyday chores like carrying groceries or reaching up high become easier and safer with stronger, more controlled movements. These daily wins can really add up to a greater sense of independence.
These benefits aren’t just perks for now. They help keep independence as we age, giving us freedom and peace of mind through our later years. Knowing you can handle your regular routine without as much worry is a huge relief.
Here are answers to the questions I get the most from people over 50 curious about starting Tai Chi:
Do I need to be flexible or athletic?
No, Tai Chi is accessible for all abilities. Flexibility and coordination naturally improve the longer you stick with it, and there’s no pressure to be perfect.
How soon will I notice benefits?
Many people feel calmer or notice better balance within three to six weeks of regular practice. Sometimes, energy improves even sooner, especially if you’re consistent about showing up.
Are there safety issues I should watch for?
Always check with your healthcare provider before starting any new activity, especially if you have medical concerns.
Take breaks as needed. Tai Chi movements are low risk, but personal comfort comes first. If you ever feel pain, pause your practice and talk to your doctor or instructor about adjustments.
Ready to Give Tai Chi a Go?
Tai Chi is low pressure, low cost, and brings benefits that really shine for adults over 50. With just a bit of curiosity and a few spare minutes a week, you can start enjoying better mobility, greater calm, and new connections.
If you’re unsure where to start, check with local community resources or browse beginner friendly Tai Chi classes online.
This simple practice could be just what you need to add some flow to both body and mind. With a little patience and regular practice, you might stumble upon a newfound confidence and ease that improves every area of life.
Steve
Some links on this site may be affiliate links, and if you purchase something through these links, I will make a commission on them.
There will be no extra cost to you and, you could actually save money. Read our full affiliate disclosure here.
Creatine is a natural compound made in your body (liver, kidneys, pancreas) from amino acids (arginine, glycine, methionine). (Wikipedia)
Here are the keys:
Most of your body’s creatine is stored in skeletal muscles (about 95%). The rest is in places like the brain, heart, etc. (Wikipedia)
In muscle, creatine is stored often as phosphocreatine. During high‐intensity, short bursts of energy (like sprinting, lifting weights), phosphocreatine helps regenerate ATP (the body’s energy currency) quickly. That helps you work harder for slightly longer. (Healthline)
We also get creatine from diet (especially meat, fish). But the amount from food plus what we make inside usually isn’t enough for people doing serious high-intensity training if they want the performance bump. (Healthline)
So, many people use creatine supplements to raise muscle stores of it, which can give benefits like more strength, more reps, faster recovery, possibly some brain/cognitive benefits under certain conditions. (Healthline)
Standard vs Loading vs “Mega-Dosing”
Before talking mega-dosing, it helps to know what usual practices are.
Maintenance dose: ~ 3-5 grams per day is the standard amount to maintain elevated muscle creatine levels. This is what many studies use. (Harvard Health)
Loading phase (optional): some people do a loading phase — higher amounts for a short period (for example ~20 grams per day split into 4 × 5g doses for ~5-7 days) to fill creatine stores fast. After that, they drop to maintenance. (PMC)
Can We Mega-Dose Creatine?
“Mega-dosing” would mean taking much higher amounts than standard/maintenance dose, often long term, possibly several times the typical loading dose, either in single big doses or many grams per day.
Here’s what the evidence says — the good, the bad, and the unknown.
Possible benefits?
Faster initial saturation: Higher doses (loading) do help saturate muscle creatine stores more quickly. If someone wants effects ASAP, loading helps. (PMC)
In some studies, higher short-term dosing (for example 20 g/day for a few days) has been used safely in healthy adults. (PMC)
There are hints that in some medical settings, higher creatine doses might have benefits (e.g. rehabilitation, certain disease states) but research is limited. (PMC)
Risks & downsides
Gastrointestinal discomfort: big single doses or too much at once often lead to stomach upset, diarrhea, belching. Splitting doses helps. (Healthline)
Water retention / weight gain: since creatine draws water into muscles, extra creatine means more water storage, which shows up as weight gain. That’s usually harmless, but can be uncomfortable or unwanted in some sports. (Cleveland Clinic)
Strain on kidneys? For healthy people, current evidence suggests creatine is safe, even for years. (Mayo Clinic) But for people with existing kidney disease, or at risk, greater caution is needed. Mega-dosing might increase risk due to greater creatine / creatinine load. (Cleveland Clinic)
Diminishing returns: once muscle creatine stores are saturated, extra amounts beyond maintenance are largely excreted via urine. So mega-dosing beyond what raises your stores more doesn’t give more benefit. (Healthline)
How “mega” is too “mega”?
Studies often use loading doses (~20 g/day) split across the day, for short periods. That’s not the same as taking 20-30+ g once daily long term. (Healthline)
Single very large doses (e.g. >10 g at once) are more likely to cause GI distress. (Healthline)
What Science Currently Supports / Doesn’t
What is well supported:
Taking ~3-5 g/day of creatine monohydrate in healthy adults improves strength, muscle mass under resistance training. (Examine)
Safety is good in healthy populations for long-term, at the recommended doses (3-5 g/day). (Mayo Clinic)
What is less clear / uncertain:
Long-term safety of very high doses (mega-dosing) over many months or years. Not much high-quality data.
Safety for special populations (those with kidney issues, youth, pregnant women) under high dosing.
Whether the cognitive / “other non-muscle” benefits scale with mega-doses or whether they’d plateau.
Bottom line: Should You Mega-Dose?
Here’s a practical perspective:
If your goal is muscle strength, performance etc., standard dosing (3-5 g/day) or doing a short loading phase if you want quicker saturation, is sufficient and safest.
Mega-dosing might speed up the process a little, but comes with increased risk of side effects, discomfort, and possibly stress on kidneys in susceptible people.
If you try higher doses, do it in split doses (don’t take all at once), ensure hydration is good, and monitor how your body responds.
Recommendations & Safety Tips
Start with maintenance dose: 3-5 g/day, for several weeks, see how you feel and how your training goes.
If desired, use a loading phase safely: e.g. ~20 g/day split into 4 × 5 g doses for 5-7 days, then drop to maintenance.
Stay well hydrated: creatine pulls water into muscles; you may need more fluids.
Watch for digestive issues: splitting doses, using creatine monohydrate that dissolves well (micronized) can help.
Check with a doctor if you have kidney/liver issues or other health conditions before high doses or long use.
Quality matters: use verified, high-purity supplements. Because supplements are less strictly regulated than medicines, quality and purity vary. (Harvard Health)
I am 67 and have been mega dosing for a couple of years now. I started it because I wanted my energy back. I also take high absorption magnesiumand it certainly helps.
However I don’t feel like I am 30 or even 40. but I feel a damned site better than I did before. Your choice is to give it a shot for a month or two and see how you feel.
Stay strong
Steve
Not A.I.
Some links on this site may be affiliate links, and if you purchase something through these links, I will make a commission on them.
There will be no extra cost to you and, you could actually save money. Read our full affiliate disclosure here.
If you’ve ever felt tired during the day or struggled to fall asleep at night, you’re not alone. I used to think that sleep was just something that happened when I was exhausted, but I’ve learned that sleep quality depends on more than just how worn out I feel.
Sleep optimization and circadian health are now getting a lot of attention, thanks to new research and a growing focus on wellness. I’ve found that understanding how sleep works and making small changes in my daily routine can really improve my energy, focus, and mood.
Why Sleep Quality and Circadian Health Matter
Sleep plays a big role in almost every aspect of health. Most people know that a lack of sleep makes you feel groggy, but what’s less obvious is how it affects things like immune function, weight, mental sharpness, and emotional balance.
Our bodies run on a built-in schedule called the circadian rhythm; a kind of 24-hour clock that controls when we feel sleepy or alert. Messing with this clock (like pulling all-nighters or binge-watching shows late into the night) can really throw off how we feel and how well our body works.
According to the Sleep Foundation, consistently missing sleep can lead to trouble concentrating, weaker immune defenses, and higher risk for conditions like diabetes and heart problems. Prioritizing both sleep duration and quality gives your body a chance to heal, recharge, and keep your mind clear.
Getting Started with Sleep Optimization
Getting better sleep doesn’t always mean aiming for more hours in bed. It’s also about quality and timing. Here are a few fundamentals I focus on in my own sleep routine:
Regular Sleep Schedule: Going to bed and waking up at roughly the same time each day helps train your body’s clock so you get sleepy and wake up naturally.
Comfortable Sleep Environment: Keeping the bedroom cool, dark, and quiet does wonders for restful sleep. I use blackout curtains and a white noise machine for this.
Daytime Light Exposure: Getting some sunlight, especially early in the day, tells your body it’s time to be awake and sets up your internal clock for an easier wind-down at night.
Wind-down Routine: I save intense workouts and bright screens for earlier in the day and opt for reading or calming music close to bedtime.
Even small tweaks, like putting away my phone 30 minutes before bed or setting a consistent wake-up time, make a noticeable difference after just a few nights. Over time, these habits can really add up and start to create a natural routine that feels effortless. You might be surprised how little things such as changing your pillow or adjusting your thermostat can give a boost to your sleep comfort.
Key Sleep Concepts to Understand
Learning what affects sleep helps when trying out new strategies. Here are some terms I found helpful to know:
Sleep Cycles: These are repeated patterns of REM (rapid eye movement) and non REM sleep. Cycling through both helps the brain and body recover.
Sleep Pressure: The longer you’ve been awake, the stronger the urge for sleep; think of it as a growing desire that’s reset by actual sleep.
Melatonin: Often called the “sleep hormone,” melatonin levels rise after dark, making you feel sleepy. Bright lights, including your phone screen, can suppress it.
Chronotype: This is your natural tendency to be more alert in the morning or evening. Some people feel best waking up at sunrise, others do better at night.
Knowing your sleep rhythm and being honest about your bedtime habits is the first step to making realistic changes. If you’re unsure about your chronotype, try tracking your natural sleep and wake times for a week and see when you feel the most energized or sluggish. This helps you get a sense of what schedule might suit you best when mapping out your ideal rest plan.
Quick Sleep Optimization Guide
Building better sleep isn’t about overhauling your life overnight. I picked up these practical steps along my own sleep improvement adventure:
Set Your Schedule: I stick with a bedtime and wake-up time that works, even on weekends. Consistency gives my body a steady rhythm to follow.
Get Natural Light During the Day: Morning sun gives my brain a clear “wake up” signal, making it easier to feel sleepy when night comes.
Avoid Big Meals and Caffeine Late: Heavy food or coffee in the evening keeps me up, so I switch big meals and drinks to earlier in the day.
Create a Relaxing Ritual: Stretching, reading, or listening to a chill playlist signals to my brain that it’s time to wind down.
Reserve the Bedroom for Sleep: I try not to bring work or TV into bed; the fewer distractions, the better my mind associates the space with sleep.
When I focus on these basics, my sleep gets deeper and my mornings feel less rushed. I’ve also noticed that a stable routine helps me wind down, making it easier to fall asleep—even when things get stressful.
Things to Think About Before Trying Sleep Hacks
Sleep advice seems to be everywhere, but not all tips work equally for everyone. It’s smart to watch out for common roadblocks as you test new habits. Here’s what I pay attention to in my own routine and with friends:
Screen Time: Scrolling endlessly or watching TV late makes it harder to fall asleep. Blue light from screens tells my body to stay awake. I use a blue light filter if I’m on a screen late.
Irregular Bedtimes: Switching sleep times, even by just an hour or two, often leaves me feeling like I have mild jet lag.
Anxiety or Stress: Worries tend to pop up at night. Mindfulness, journaling, or light breathing exercises help calm racing thoughts for me.
Noise or Light: Even small noises or streetlights can mess with my rest. Earplugs and blackout shades are worth it if your space isn’t naturally quiet or dark.
Screen Time and Light Exposure
Smartphones and tablets can keep you up long after you turn out the lights. I try to minimize late night exposure to screens and bright bulbs. If I absolutely have to respond to messages or check something, I use the device’s night mode to shift the screen to warmer tones.
Balancing Social Life and Sleep
It’s easy to let sleep slide when life gets busy. If I’m out late or need to change my routine, I aim for consistency the next night instead of stressing. Sleep debt can build up, but I focus on doing my best rather than chasing perfection. Even adjusting by just half an hour can help you avoid feeling totally thrown off the next day.
Supplements and Sleep Aids
Personal experience, and advice from credible sources like the Mayo Clinic, suggests going easy on sleep aids and melatonin supplements unless checking with a doctor. Good sleep habits do more than most over-the-counter pills ever will.
Being honest about challenges helps when testing new tweaks to your routine. The key is patience. Lasting sleep improvements happen over weeks, not days, so give yourself time to adjust and see how things play out before deciding whether a change works for you.
Tips to Level Up Your Sleep Game
If you’re feeling comfortable with the basics, there’s a lot of next-level cool stuff out there to bring things to the next stage:
Track Your Sleep:Wearables and smartphone apps can log sleep and wake times, offering a more super detailed picture than just guessing each morning. This data helps spot patterns and shows if changes are working for you, especially if your routine is complicated or your schedule is inconsistent.
Master Your Environment: Try a humidifier if air feels dry, experiment with a weighted blanket for comfort, or tweak room temperature. Most people find that 60-67°F (16-19°C) feels best for solid sleep. An eye-catching nightlight that stays dim can also give a boost to calmness if you need to get up in the middle of the night.
Experiment with Naps: Short naps (about 20 minutes) set free extra alertness without taking away from nighttime sleep. Longer naps might leave you groggy or double up on sleep pressure.
Listen to Your Body: Some days, your body needs more rest. I allow flexibility and avoid being harsh on myself if I need to sleep longer after a rough day. Self-compassion makes sticking to new habits easier over time.
Mixing these tricks into your approach lets you fine-tune your routine and see what really gives a boost to your energy and focus. Remember: there’s no “perfect” sleep routine—what counts is what keeps you feeling your best.
Real-Life Sleep Optimization Examples
Personal stories make all this way more believable than just generic advice. My energy took a big jump when I swapped late night screen time for reading and added blackout curtains to my room. I noticed I stopped waking up at 3 AM when I stopped drinking coffee after noon. Here are a few other common examples I’ve seen work for others:
Working from Home: Folks who anchor their day with a set wake-up and bedtime keep their body clocks running smoothly, even without a commute.
Shift Workers: Blackout curtains and strict wind-down routines help people adjust their clocks if they have to work late or overnight. Blocking out morning light tricks the brain into getting quality sleep, even at odd hours.
Parents: Taking turns on nighttime duties or scheduling quick breaks during the day can help keep energy balanced, even with a newborn. A tag-team approach to naps can make a huge difference.
Great sleep doesn’t always require pricey gadgets or trendy diets. Most of the time, small, everyday changes add up fast and make a bigger impact than you’d expect.
Frequently Asked Questions
I get a lot of questions about sleep hacks and circadian health, so here are a few I hear most often:
Question: How many hours of sleep do adults actually need? Answer: Most adults do best with 7–9 hours, but needs vary. If you feel alert and don’t need caffeine to function, you’re probably getting enough.
Question: Is it bad to sleep in on weekends? Answer: A little extra rest is okay if you’re tired, but big swings in wake-up times can mess with your circadian rhythm. I try to keep differences to under an hour if possible.
Question: What if I wake up in the middle of the night and can’t fall back asleep? Answer: I get up, do something relaxing in dim light, and avoid screens until I feel sleepy again. Tossing and turning in bed usually just makes me more alert. Sometimes, just stepping out for a glass of water can help reset your calmness so you can fade back to sleep.
Final Thoughts
Getting quality sleep is a game-changer for how you feel throughout the day. By learning about your own sleep habits, making small changes, and staying consistent, you can set yourself up for more restful nights and brighter days.
Pay attention to what works best for your routine and remember, the best sleep optimization plan is the one you can actually stick with in the long run.
Wrapping up, good luck on your sleep adventure. Don’t forget that a little sunlight, a comfy bedroom, and a regular bedtime go a long way to setting you up for your best days ahead!
Steve
Some links on this site may be affiliate links, and if you purchase something through these links, I will make a commission on them.
There will be no extra cost to you and, you could actually save money. Read our full affiliate disclosure here.
Strong knees are super important. They’re what keep you walking, running, and going about daily life without pain. Whether you’re bouncing back from an injury or just want to stay active as you get older, working on knee strength pays off in a big way. Trouble is, weak knees can sneak up on you, leading to discomfort or even bigger problems if you don’t take action early.
If you’ve ever struggled with knee pain, felt wobbly on stairs, or worried about keeping up with your favorite activities, you’re definitely not alone. Building up those knee muscles and the joints around them is easier than you might think, and putting in small efforts can make a real difference in your comfort and mobility. Knees do a lot for you, and they deserve some attention.
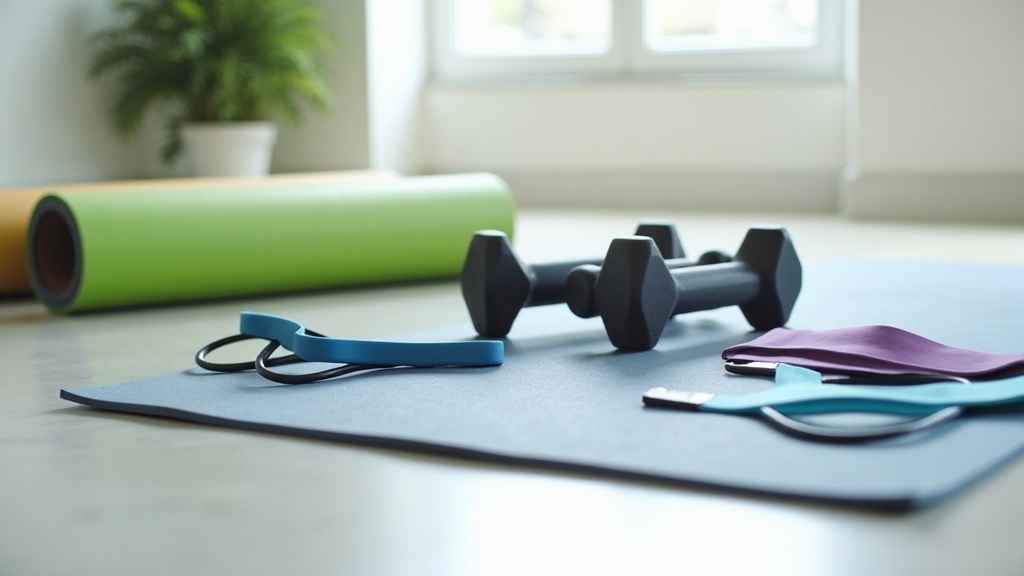
I’ve rounded up 10 of the best knee strengthening exercises that you can do at home or anywhere else. These moves are straightforward, don’t call for fancy equipment, and are a smart addition to almost any fitness routine.
It is a good idea to check with your physiotherapist before starting a new exercise plan, especially if you’re healing from an injury or new to these movements.
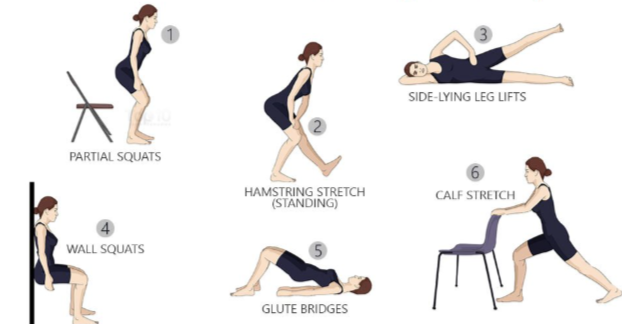
1. Straight Leg Raises for Stability
Straight leg raises help target your quadriceps, the big muscles at the front of your thighs that play a key role in supporting your knees. If you’re just starting out or recovering from knee pain, this move is usually safe and helpful.
How to Do It:
Lie flat on your back with one leg bent and the other straight.
Tighten your thigh muscle and slowly lift the straight leg up to the height of your bent knee.
Hold for two seconds, then lower it back down with control.
Try 10-15 reps per leg, two to three sets.
This gentle move builds up the muscles needed for daily movements and protects your knees from strain. It’s also effective as a warm-up or as part of post-rehab.
2. Seated Knee Extensions for Easy Strength
Seated knee extensions are great for building up the quads without putting extra stress on your knee joint. This is a go-to move for beginners or anyone who needs something easy on the joints when they’re starting out.
How to Do It:
Sit tall in a sturdy chair with your feet flat on the floor.
Extend one leg out until it’s almost straight (don’t lock your knee).
Hold for two seconds, then lower it back slowly.
Aim for 12-15 reps on each side, with two or three sets.
This one helps give a boost to knee strength for actions like standing up from a chair or climbing stairs. As you get stronger, you can add ankle weights for an extra challenge.3. Step-Ups to Mimic Real Life
Step-ups are pretty much like climbing stairs, but you can tweak the height to match your ability. Doing step-ups gets your glutes, hamstrings, and quads all working at once, a total win for knee support. Plus, the movement helps build balance and coordination you use every day.
How to Do It:
Find a step, sturdy bench, or box about knee height.
Step up with one foot, pressing through your heel, and bring the other foot up to meet it.
Step back down and repeat. Switch legs after each set.
Go for 10-12 step-ups per leg for two or three sets.
If balance is tricky, hang onto a wall or railing. Step-ups help you keep your confidence while moving and can even reduce the risk of trips or falls over time.
4. Wall Sits for Serious Burn
Wall sits work your quads, glutes, and calves with one simple (but challenging) isometric move. If you need to strengthen knees for sports, hiking, or even standing for long stretches, wall sits can help get you there. This move also boosts your muscular endurance and stamina.
How to Do It:
Stand with your back against a wall, feet about shoulder width apart and two feet from the wall.
Slide down until your knees are bent at roughly 90 degrees, like sitting in a chair (don’t let knees go past your toes).
Hold as long as you can with good form (aim for 20-40 seconds to start).
Rest and repeat for two or three rounds.
If this move feels tough at first, just lower down as far as feels good. Growth happens over time, so keep at it and you’ll see improvements in your knee stability.
5. Glute Bridges to Build a Solid Base
Your glutes are the foundation for all lower body movement, and strong glutes take pressure off your knees. Glute bridges target these important muscles without putting extra load on your joints. This move can also help with low back stability, which is great for whole-body health.
How to Do It:
Lie on your back, knees bent, and feet flat on the floor.
Lifting through your heels, squeeze your glutes and lift your hips toward the ceiling.
Hold at the top for a second, then lower down with control.
Do 12-15 reps for two or three sets.
Stronger glutes make sure your knees are lined up and lessen aches after busy days. As you progress, you can try single-leg bridges for a tougher workout.
6. Side Lying Leg Raises for Stability
Side lying leg raises might not look fancy, but they’re fantastic for strengthening your hip abductors. These muscles help keep your knees centered with each step, cutting down on the risk of injury. Improved hip strength also keeps your gait balanced, making walking and running smoother.
How to Do It:
Lie on your side with legs stacked and straight.
Lift your top leg about 12-18 inches, keeping it straight and in line with your body.
Lower back down. Repeat 12-15 times per side, two or three sets.
Finish one side, roll over, and tackle the other. These work your hip and thigh muscles, which help protect your knees with every step. Add a resistance band above the knees if you want to step up the intensity.
7. Calf Raises for Lower Leg Power
Calf raises don’t just strengthen your calves. They give a boost to ankle stability and add support for your knees. All you need is a flat floor and maybe a wall or counter for balance during the exercise.
How to Do It:
Stand with feet hip width apart.
Rise up onto your toes as high as you can, feeling your calves engage.
Lower down slowly. Repeat for 15-20 reps, two sets.
With time, add a third set or do the movement on one leg for extra challenge. Calf strength helps make your step steadier across uneven ground.
8. Mini Squats (No Deep Bending Needed)
Mini squats work your thighs and glutes while keeping stress low on the knees. If full squats are tough right now, this version gets you close to the same benefits without risking pain or discomfort.
How to Do It:
Stand with feet shoulder width apart. Hold onto a sturdy chair or counter for support.
Bend your knees slightly (about 30-45 degrees), keeping your chest up and back straight.
Return to standing. Repeat 12-15 times, two to three sets.
Shallow squats still work your muscles and keep your knees moving in a comfortable range. If pain shows up, pause and give your knees a rest before trying again.
9. Clamshells to Target Outer Thighs
Clamshells focus on your glutes and the outer thigh, which stabilize your hips and knees. They’re really helpful if you spend a lot of time sitting and want to wake up those overlooked muscles.
How to Do It:
Lie on your side with knees bent, legs stacked, and feet together.
Keeping feet touching, lift your top knee as high as possible without moving your pelvis.
Lower back down. Perform 12-15 reps per side, two sets.
Once you’ve built up some strength, you can introduce a resistance band above your knees for added challenge and even more activation in those outer hip muscles.
10. Hamstring Curls for Back-of-the-Knee Support
Hamstring curls focus on the muscles behind your thighs, which help control knee movement and protect against hyperextension. Keeping those hamstrings strong helps keep everything in balance around the knee joint.
How to Do It:
Stand holding a chair or countertop for balance.
Lift one heel up toward your butt, keeping knees together and thigh steady.
Lower it back down with control. Do 12-15 reps per leg, two or three sets.
Hamstring curls round out your knee workout and help balance out all the quad work from earlier moves. As you get stronger, you can even try these with ankle weights or resistance bands for an extra boost.
How to Build a Knee Strengthening Routine
Mix and match the exercises above for an all-in-one knee routine. I like choosing three to five moves and doing them every other day, with plenty of water breaks and a gentle warm-up first. If you’re pressed for time, even just a few sets makes a big difference. Sticking to a routine over time works much better than trying to go all out in one session and risking soreness or injury.
Listen to Your Body
If you feel sharp pain, stop and check your form, or take a break.
Start with smaller ranges of motion or fewer reps if you need to.
Focus on doing each move well for better, lasting results.
Everyone’s knees are different, so it’s totally fine to tweak the exercises to match how you feel. Quality matters more than the number of repetitions, especially as you build strength and confidence.
Final Tips for Stronger Knees
Making your knees stronger goes beyond just building muscle. Flexibility, balance, and being mindful of your movement all play a role in how your knees work and feel.
Don’t forget to cool down after your workouts, do some gentle stretches, and always pay attention to good form. Staying proactive with these exercises can help your knees feel better, move more easily, and stay strong so you can keep up with the activities you enjoy.
Ready to check out these knee strengthening exercises for yourself? Let me know how it works for you. I’m always happy to share extra tips and help you keep moving comfortably and confidently.
If you’re over 60, doing squats is really good to start help losing weight and looking after your knees. I used to dread stairs and long walks, until I discovered that the key to relief wasn’t avoiding movement but gently strengthening my legs again.
I used to have sore knees and found through the process I used below helped my knees started feeling better. it also improved my balance and mobility.
And that was because I started building up my muscles in my legs again, which helped fix my joint pain. That’s because strong muscles, especially in the quads, hamstrings, and glutes, take pressure off the knee joint.
When those muscles are weak, your joints absorb more of the load during walking, standing, or climbing. Strengthening them helps improve alignment and stability, which means less wear and tear on your knees over time.
If you haven’t done any exercise for a while, it’s probably going to be pretty hard to start straight off doing squats. I know, because I couldn’t do it even after walking and basic exercising for a few months.
My exercises
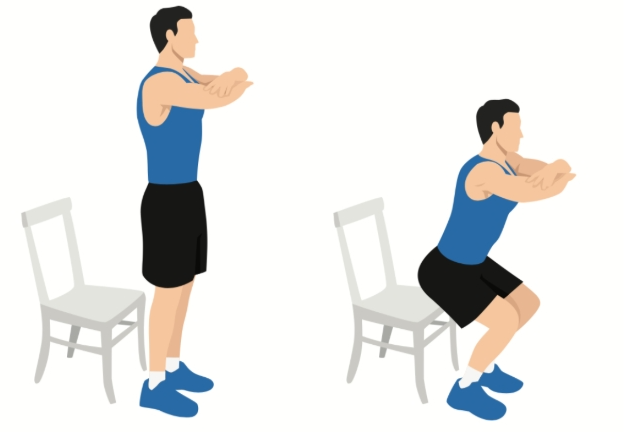
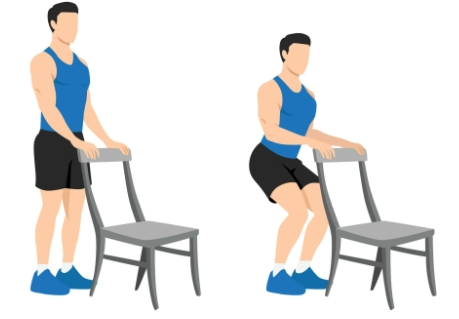
So, what I recommend is starting by doing chair squats, that is sitting on the chair and doing squats while holding the sides of the chair.
When you are ready do the same but don’t hold the chair, fold your arms in front of you. Remember it is not a race, take your time.
And then after a month or when you feel you’re ready, use a chair to support your body, and start doing squats, working closer to the ground as you feel ready.
After that you can start doing squats without the use of the chairs.
It doesn’t matter if you don’t get down to the floor first go, take your time and try 50% first and if and when you feel comfortable…continue. The first few times I tried I almost gave up, but I kept going and am damned please I did.
My feelings
I am 67 and now do my squats with a 10-kilo dumbbell, and yes, it is not easy, but my knee pain is gone, and I walk downstairs with confidence instead of bracing for discomfort.
So, if you’re hesitant to start, don’t worry. You don’t need a gym, just a chair and a bit of patience. Build your leg strength, and your knees may just thank you for it. An added benefit is I have lost over 10 kilos in weight, and I feel a lot healthier.
Steve
Some links on this site may be affiliate links, and if you purchase something through these links, I will make a commission on them.
There will be no extra cost to you and, you could actually save money. Read our full affiliate disclosure here.
Staying healthy and feeling young isn’t just about avoiding wrinkles or running a marathon past your 80th birthday. There’s a growing interest in supplements that actually support healthy aging from the inside out. People want everything from more energy and mental sharpness to healthier joints and better skin. With all the hype, though, it helps to know which longevity and natural anti-aging supplements are worth your attention. It’s also important to know which ones actually have science behind them.
If you’re sometimes overwhelmed by the choices at your local store or online, you’re definitely not alone. From adaptogens to antioxidants, the claims are everywhere. But understanding how these supplements work and what they really do for your body is super important before you add anything to your routine. When you do your research, you’ll be able to make more confident choices—and save your wallet from things that simply don’t work.
In this guide, I’m breaking down my top recommendations for natural anti-aging and longevity supplements. I’ll go over why they matter, what benefits they might offer, and how to use them wisely. As always, it’s important to talk to a healthcare provider if you have questions about what’s best for your specific needs. Adding smaller lifestyle changes alongside supplements can give your healthy aging plan a real boost as well.
Your cells use NAD+ (nicotinamide adenine dinucleotide) to manage energy, protect DNA, and keep things running smoothly. As you get older, NAD+ levels tend to drop, which can slow down repair processes and leave you feeling sluggish. That’s where supplements like nicotinamide riboside (NR) and nicotinamide mononucleotide (NMN) come in; they help boost NAD+ production naturally and get those cellular processes back on track.
What’s So Useful About NAD+ Precursors?
Promote energy production at the cellular level
May support better brain function and memory
Help reduce signs of aging by supporting DNA repair
Potential to support healthy muscle and tissue recovery
Always look for reputable brands and start with a smaller dose to see how your body reacts. Some people notice a boost in steady energy within a few weeks. To maximize the effects, consider pairing these supplements with plenty of restful sleep and balanced nutrition.
Curcumin is the bright yellow antioxidant found in turmeric. It’s well-known for helping soothe inflammation, but it’s also been studied for supporting brain, joint, and heart health over time.
Since chronic inflammation speeds up aging, curcumin is a pretty handy option if you’re looking for something with a long history of traditional use and modern research backing. People have even reported improvements in exercise recovery and flexibility after including it in their routines.
How to Use Curcumin Best:
Pair with black pepper (piperine) to help your body absorb it better
Look for supplements labeled “bioavailable” or “enhanced absorption”
Consider taking it with meals for better digestion
Avoid taking large doses all at once. Start low and see if it helps your joint comfort or general aches. Those who stick with it often say their overall comfort in daily life improves over time.
Resveratrol is a natural antioxidant found in red wine, grapes, and some berries. It’s known for its heart-protective qualities and potential to activate pathways tied to longevity.
Researchers are still figuring out all the ways it might work, but it’s definitely on the radar as one of the more popular anti-aging supplements. Some people use it in combination with NAD+ boosters for a double punch of support.
Why Resveratrol is Worth Checking Out:
Supports healthy blood vessels and cardiovascular health
Helps the body fight oxidative stress (free radical damage)
May assist with healthy inflammation responses
Has potential benefits for skin and cell aging
The effective dose can vary a lot, so check what’s recommended on your product and consult your healthcare provider if you’re considering using it regularly. Pairing it with a plant-rich diet may help you get even better results.
Collagen keeps your skin firm, your joints moving smoothly, and your hair looking good. Sadly, collagen production naturally drops off as you get older, which can cause sagging skin, creaky joints, or brittle nails. That’s where collagen supplements, especially hydrolyzed peptides, come into play. This type is easier for your body to put to work right away.
Collagen Supplements at a Glance:
Help support skin hydration and reduce the appearance of fine lines
May ease joint discomfort and promote flexibility
Support healthy hair and stronger nails
Can help with recovery from exercise and daily wear and tear
I’ve noticed that powder forms are easy to add to smoothies or morning coffee, and many people see improved results after taking them consistently for a few months. Stay hydrated to help your body make the most of the collagen you add.
Omega3s, especially EPA and DHA found in fish oil or algae oil, are famous for supporting heart and brain health. Since your body doesn’t make these fats on its own, getting enough from supplements can be a good move if you don’t eat a lot of fatty fish. They’re also important for keeping your joints feeling flexible and comfortable as you age.
How Omega-3s Help With Aging:
Support healthy blood pressure and cholesterol levels
Promote better mood and brain function
Help keep joints comfortable and mobile
Show promising signs in maintaining eye health
Quality matters a lot here. Look for third-party tested brands and keep the bottle refrigerated to avoid that fishy flavor. You might also want to check for products that include antioxidants to keep the oils fresh.
Adaptogens like ashwagandha, rhodiola rosea, and holy basil help the body handle stress and keep hormones balanced.
Chronic stress can speed up physical aging, so having these herbal supplements on hand makes sense, especially during busy times.
Adaptogens aren’t just for handling daily stress—they can also help your body adapt to physical or mental demands over time.
Top Adaptogens for Longevity:
Ashwagandha: Promotes calm and may support restful sleep
Rhodiola: Adds natural support for energy and stamina
Holy Basil: May help with immune defense and daily stress
Schisandra: Known for its ability to support liver function
Adaptogens work best when taken regularly, rather than only during high-stress moments. It might take a couple of weeks to feel their full effect, but consistency is key with herbs like these.
Healthy aging starts in the gut. Probiotics introduce beneficial bacteria, while prebiotics feed those bacteria so they thrive. Together, they help with digestion, support the immune system, and may even play a role in healthy moods. Some research suggests supporting gut health can also improve sleep and make it easier to maintain a healthy weight.
Why Gut Health Matters for Aging:
A healthy gut supports better nutrient absorption
A balanced microbiome can regulate inflammation
Gut health is linked to clearer skin and mental sharpness
Maintaining gut balance may even support heart health
If you’re brand new to probiotics, start slow; some people notice a bit of digestive change during the first week or two as your body adjusts. Taking them with food can sometimes help your system adapt more comfortably.
Green tea extract delivers antioxidants like catechins, which play a role in fighting cellular aging. It’s also known for supporting a healthy metabolism and providing gentle, natural energy without making you jittery. Some research even connects green tea antioxidants to better heart and blood vessel health.
Benefits You Might Notice:
Supports metabolic wellness
May help the skin combat sun damage and aging
Offers gentle mental clarity (thanks to a hit of natural caffeine)
May have a mild effect on weight management goals
Watch out for high doses, which might make sensitive people feel wired. Look for supplements that specify caffeine content if you are watching your intake.
Adding Supplements Safely to Your Routine
If you’re taking other medications or dealing with ongoing health concerns and worry about conflicting medicines or any side effects, by all means contact a health provider you can trust.
And reading third-party reviews and checking for quality testing can help you spot legit products and avoid those that don’t deliver what they promise. Consider tracking your progress with a journal to spot positive changes and pinpoint what’s truly working.
Some say supplements aren’t a magic bullet and only fill in nutritional gaps, and others swear by them and will not use traditional medicines. Make up your own mind and don’t be bullied by any side about your wellness goals.
By pairing them with a balanced diet, regular activity, decent sleep, and good hydration it must help for living well at any age.
Final Take
Staying ahead of aging with a few well-chosen supplements is totally doable. From NAD+ boosters and collagen to omega3s and adaptogens, these options can help you feel your best and keep your mind and body resilient.
Track how you feel, make changes gradually, and celebrate the positives you notice along the way. It’s all about consistency and picking what works best for your unique needs. Remember, supplement choices are personal; what helps one person might not be as effective for another. Trust your own experience and adjust as you go for a long, healthy, and vibrant life.
Steve
Some links on this site may be affiliate links, and if you purchase something through these links, I will make a commission on them.
There will be no extra cost to you and, you could actually save money. Read our full affiliate disclosure here.
In the swirl of everyday life, wellness often feels like a distant aspiration rather than a lived reality. Yet real transformation unfolds when we build a gentle, sustainable structure beneath our daily routines.
This becomes a framework that honors every part of your being. I’d like to share a vision I call The Eight Pillars of Holistic Wellness, grounded in research and human experience, that invites you into deeper rest and vitality.
At its foundation lie four central practices, physical activity, mindful eating, restorative sleep, and breathing techniques. Around them revolve the softer dimensions such as emotional balance, mental clarity, spiritual connection, and social nourishment. Together these pillars support a life that feels grounded, resilient, and resonant with meaning.
Movement as Sustenance
Movement isn’t about punishment or performance, it’s a way to breathe energy into your bones, to steward your body with kindness. Research shows that even moderate aerobic exercise, just short daily sessions, measurably lifts mood, reduces stress, and sharpens mental focus.
Whether it’s a brisk walk in the morning, a few slow yoga flows, or playful tai chi in the afternoon sun, physical activity grounds us in our physical selves and opens space for clarity and peace.
Gentle movement can be as effective, and more sustainable, than intense routines. Experts recommend forms like tai chi, qigong, or dance not only for strength and flexibility, but also for emotional release and inner alignment.
Think of movement as prayer in motion, a way to feed both physical and subtle systems.
Mindful Eating to Nourish Body and Mind
In our fast-paced world it’s easy to rush meals or see food only as fuel. Yet mindful eating invites us to savor flavors, textures, and the lived experience of nourishment. Slowing down and tuning into each bite gives digestion a peaceful environment and brings gratitude back into our relationship with food.
Following a more whole‑food, plant‑focused approach—such as the Mediterranean style of eating—has been connected to better mood, reduced inflammation, and improved cognitive and hormonal health.
Starting meals with vegetables or aiming for a colorful mix of plants each week supports gut health, emotional balance, and sustained energy.
This becomes not a rigid diet, but a ritual of care, honoring the connection between body, mind, and mood.
Restorative Sleep is the Heart of Well‑Being
Quality sleep is a cornerstone of renewal. While most adults need at least seven hours per night, the benefits go beyond length: what matters is rhythm, consistency, and a restful mindset. When sleep feels supportive rather than elusive, every pillar of wellness gains strength, mood stabilizes, digestion flows, cognitive performance improves.
Mindfulness meditation and breathing practices have been shown to ease insomnia, lower pre-sleep arousal, and improve overall sleep quality, even in people recovering from serious illness.
Creating a gentle bedtime routine (no screens, soft lights, perhaps herbal tea) and honoring a consistent sleep schedule can transform sleep into a sanctuary rather than simply a necessity.
Conscious breathing
One of the simplest yet most transformative tools we have is the breath. Breathing practices, whether conscious inhalation patterns, pranayama, or alternate‑nostril work connects our body to our life force, calming the nervous system and grounding us in now‑ness.
Techniques such as the “finger breathing method,” where you trace fingers while observing breath, have proven calming both mentally and physically.
Daily pauses to breathe deeply, whether seated in stillness or moving slowly in qigong, become anchors in the current moment, helping untangle racing thoughts and ushering in presence.
Empathy and Emotional Resilience.
When we tend to emotional wellness with curiosity and tenderness, we cultivate resilience. Journaling, creative expression, gratitude practice all helps us to name, process, and release emotional patterns before they accumulate into overwhelm.
Approaching emotions with self-compassion and embracing our suffering with friendliness rather than judgment is grounded in ancient practices that is supported by modern therapeutic findings.
Emotionally attuned living allows us to ride stress with more agility, to experience connection more deeply, and to anchor ourselves in authentic moods rather than reaction.
The Quieting of Thought
Our minds, so often overactive and scattered, benefit from spaces of silence. Mindfulness-based stress reduction (MBSR), developed by Jon Kabat‑Zinn, teaches body scanning, yoga, and meditation as pathways to reduce anxiety, sharpen attention, and relieve rumination. Over years, meta‑analyses have shown that these practices support emotional regulation, reduce depression, and improve cognitive resilience.
Finding practice that suits you, short, guided meditation, walking in nature with attention on each footstep, or simple breath-awareness—cultivates mental clarity and a sense of being “inside your life” rather than being swept along by it.
Spiritual connection and purpose
Spiritual wellness isn’t confined to religion, it’s about feeling connected to something larger: life itself, wonder, purpose, compassion. Practices like nature connection, mindful service, reflective rituals, or breath-centered meditation foster a lived sense of meaning and reverence.
Traditions like Plum Village mindfulness emphasize ethics and presence alongside awareness, guiding our actions toward kindness, listening, and integrity at every moment
Allowing ourselves regular times of quiet reflection, ritual, or communion with the natural world sustains a softer energy that we can carry into daily tasks and relationships.
Social connection that sustains our soul.
Wellness thrives in relationship. When we feel seen and supported, stress naturally loosens its grip. Simple but potent habits—sharing meals, saying no when needed, laughing, being present with others—support both mental and emotional wellness
Even small moments of connection—sending a kind message, listening deeply, offering help—build a nourishing web of interdependence. Social wellness isn’t optional; it’s woven into the fabric of holistic health.
Integrating the 8 pillars into daily life.
These eight pillars—physical movement, mindful eating, restful sleep, conscious breathing, emotional resilience, mental clarity, spiritual connection, and social nourishment—are deeply interwoven. None stands alone. When one area is neglected for too long, others begin to wobble. But even small steps toward one pillar can ripple outwards: better sleep improves mood, a walk clears the mind, breath calms the body, and so on.
. The goal is not perfection—it’s compassionate presence and steady attention to what matters.
Embodying the Practice and steps to start
Imagine waking slowly with breath awareness, drinking water before food, stepping outside for sunlight and movement, eating meals with awareness, discovering moments to pause and breathe deeply, gently unwinding into rest without screens, sharing presence with loved ones or self, and ending the day in quiet reflection. This isn’t ambition—it’s intention. Over time, it becomes your body’s wisdom.
If you find body‑movement harder, begin with five-minute walks or a few simple stretches. If emotions feel raw, try naming a feeling in writing or speaking it aloud. If sleep is restless, begin by winding down an hour earlier or breathing gently before bed. If social connections feel distant, send one message or share one moment. Every step, no matter how small, knits resilience into your day.
Closing Thoughts
The Eight Pillars of Holistic Wellness offer a path that honors your physical vitality, emotional courage, mental calm, spiritual depth, and social belonging. When we cultivate each area with kindness, and integrate them with mindful attention, we build a foundation from which rest, clarity, and joy naturally arise.
You deserve wellness that moves with you, not against you. May these pillars support you in living with presence, meaning, and peace—each day inviting you home to your fullest, most resilient self.
I hope this resonates with you and offers both gentle invitation and practical depth.
Steve
Some links on this site may be affiliate links, and if you purchase something through these links, I will make a commission on them.
There will be no extra cost to you and, you could actually save money. Read our full affiliate disclosure here.
Longboarding is a hobby and sport that draws in people who appreciate smooth rides, fast speeds, and a unique sense of community. Whether I’m gliding down my neighborhood hills or cruising along a beachside path, longboards have brought a refreshing change to how I move and experience the outdoors.
With so many board shapes and riding styles, the longboard world feels big, but it’s not hard to jump in once I have a little background knowledge. I’ve put together this guide to share how longboarding started, why it’s different from skateboarding, and what boards I’d pick to shred and enjoy the ride.
Longboarding
Where It All Began
The story of longboarding starts in California during the 1950s and 60s. Surfers wanted something to ride when the waves were flat, so they attached wheels to wooden planks to mimic surfing on land. This “sidewalk surfing” quickly gained popularity among surfers looking to practice board control and balance away from the water.
From those early days, longboarding slowly built its own identity. The boards got longer and wider than traditional skateboards, making them much more stable for cruising and carving. The surfing influence stuck around, especially in the flowy riding styles and relaxed approach I see in longboarding communities today.
Unlike traditional skateboarding, which leaned more toward tricks, ramps, and street performance, longboarding went in several different directions. There’s downhill racing, easy cruising, dancing, and technical sliding.
The technology improved, too. Modern boards now utilize specific materials, such as bamboo and fiberglass, and wheels have become softer for smoother rides over rough terrain. This keeps longboarding fresh, allowing people to choose a style that suits them, whether they prefer a peaceful ride or a high-speed challenge.
The Difference Between Longboards and Skateboards
At first glance, longboards and skateboards might look pretty similar, but when I pick them up or ride them, the differences become obvious. Here are a few big distinctions that matter in everyday riding:
Board Length and Shape: Longboards are longer (usually 36–44 inches or even more), while skateboards are typically around 28–32 inches. This makes longboards more stable at speed and easier for big, flowing turns.
Deck Flexibility: Longboards often have more flex, which absorbs bumps and makes rides smoother. Skateboards usually have rigid decks for tricks.
Wheel Size and Softness: Longboard wheels are larger and softer, gripping pavement and rolling over cracks easily. Standard skateboard wheels are harder, which helps with tricks but isn’t as forgiving over rough terrain.
Trucks: The trucks (the metal turning parts under the board) are differently shaped. Longboard trucks are often reverse kingpin, which gives better turning and carving. Skateboards use traditional kingpin trucks that are steady for tricks and tough landings.
In short, I pick a longboard when I want an easy ride or downhill fun, and I use a skateboard when I’m heading to a skate park or trying technical tricks.
Riding Styles and What They Offer
Longboarding covers a variety of riding styles, each matched to different board types and setups. Figuring out my favorite way to ride helps me find a board that really fits my personality and goals. Here are a few of the top riding styles I’ve seen and checked out:
Cruising: This is the main style for most beginners and casual longboarders, including myself. It’s all about rolling along sidewalks, bike paths, or through parks, enjoying the scenery and the feeling of momentum. Cruiser boards are usually longer, use soft wheels, and often come in pintail or dropthrough shapes for easy handling.
Downhill: For those who love a jolt of adrenaline, downhill longboarding can be a real thrill. It involves racing down steep hills at high speeds, using special boards built for stability and control. Downhill boards are usually stiffer and wider, designed for serious grip and support. Symmetrical shapes let me handle slides and turns in any direction.
Freeride: Freeride longboarding blends speed, sliding, and tricks. I like freeride’s creative side because it lets me experiment with how I control speed and direction on steeper streets. Boards are generally symmetrical and use harder wheels for sliding, plus they may include foot pockets or slight bends for better grip.
Dancing and Freestyle: This is the most expressive style, blending smooth steps, spins, and tricks. It really is like dancing on the board. Long, flat decks with some flex feel best here, letting me walk up and down the board and pull off crosssteps or shuvits. Soft wheels and mild kicktails make tricks easier without sacrificing cruising comfort.
When I pick a style, I usually think about my favorite spots to ride, how fast I want to go, and whether I want to focus on carving big turns, going for speed, sliding, or even adding dance moves.
Quick Tips to Get Started
Starting with longboarding doesn’t require a bunch of fancy gear, but a few smart tips make the whole experience safer and more enjoyable. Here’s what helped me during my first few rides:
Pick the Right Board for Your Style: Job number one is figuring out if I’ll cruise, bomb hills, or start dancing. Matching the board shape and wheels to my riding plan keeps things simple.
Safety Gear: I always use a helmet and slide gloves, especially if I’m riding faster or learning new slides. Kneepads and elbow pads help prevent scrapes too.
Practice Balance and Turning: I started on flat pavement, learning how to push off, balance with one foot, and make easy turns. Taking things slow at first really helps when moving to steeper ground later.
Learn the Basics of Stopping: Foot braking and carving wide turns help slow things down. As I got better, sliding became a useful way to stop at higher speeds.
Respect Others and the Environment: I stay alert for bikers, pets, or pedestrians—sharing paths and being mindful means everyone gets to enjoy the ride.
Over time, these habits made shredding feel natural, allowing me to explore more challenging routes with ease. Connecting with local riders or watching online tutorials also gave me fresh tips and inspiration to level up my skills.
Common Longboarding Challenges
Learning to shred with longboards brings a few common challenges, but I found these can be managed with a little patience:
Rough Terrain: Longboards handle cracks and rocks better than traditional skateboards, but really rough or gravelly roads can still throw off my balance. Planning routes on smoother pavement keeps things fun and easy.
Board Maintenance: Wheels and bearings need to be cleaned for smooth rolling. I handle this with a soft brush or a special bearing cleaner. Swapping out worn wheels is worth it if my ride feels bumpy.
Weather Risks: Wet or sandy roads lead to slipping and bad falls. I check the weather before heading out and stick to dry days to stay safe.
Learning Curves: Wiping out during my first downhill runs, or losing balance while carving, happens to everyone. Practicing balance, controlling my speed, and starting on gentle hills have all helped build my skills.
Staying Safe While Longboarding
Safety is really important, especially as I get faster or ride in busy areas. Wearing a helmet is always my top priority. Head injuries are no joke and are mostly avoidable with good gear.
Gloves and pads offer extra protection, especially for slides and new maneuvers. I also check that my trucks are tight, wheels spin freely, and nothing odd is rattling underneath before every ride.
I learnt all this after coming off my board at about 40mph going down a steep decline and hitting a stone. I came off and scraped my chin, stomach and legs. A cop pulled up after being called and asked if I was ok. LOL, I said yep and waddled home.
Keeping Your Board in Great Shape
Looking after my longboard isn’t difficult, but it does help me ride smoother for longer. Cleaning bearings, checking for loose bolts, rotating wheels, and wiping grime from the trucks keeps things working nicely. I swap out bushings or wheels if they’re worn down or feel too hard, since this makes a huge difference in stability and ride comfort. A little care stretches out my board’s life and keeps my rides fun.
Longboards Worth Checking Out
After riding and researching, I’ve found plenty of longboards to fit different styles and budgets. When picking a board for beginners, I check if it fits my height, uses reliable trucks and wheels, and is made of quality materials. Here are a few types I’d recommend for shredding right out of the box:
Pintail Cruiser Longboards: Classic surf-inspired shapes make these boards stable and forgiving for relaxed rides and wide carves. Soft wheels soak up bumps, making them an excellent pick for beginners and chill rides.
Dropthrough Longboards: These boards are lower to the ground, so you get more stability and easier pushing. Reverse kingpin trucks provide smooth carving, and they work well for cruising and gentle downhill.
Freeride and Slide Boards: Symmetrical decks with crisp edges and medium flex let me slide, spin, and test out technical moves. Harder wheels are great for sliding, while foot pockets give a better grip for sharp maneuvers.
Dancer Boards: Super long, flat decks (48 inches or more) let me try steps, spins, and footwork with lots of space. Mild flex and big, soft wheels help keep tricking and cruising comfortable.
The best board for me comes down to how I want to enjoy my rides. Whether I want to relax, chase speed, or get creative with dance steps, there’s a longboard that fits.
Frequently Asked Questions
Question: Do longboards work well for beginners? Answer: Absolutely. Longboards are usually easier for new riders thanks to their stability and forgiving wheels. Starting on gentle ground with a stable cruiser board is a great way to learn the basics fast and safely.
Question: Can I use a longboard for commuting? Answer: Of course. Many people use longboards to get around campus, to work, or just to explore town. They roll smoothly and handle bumps better than skateboards, making longer rides more pleasant.
Question: How do I pick the right longboard size? Answer: Most beginners do well with decks between 38 and 42 inches long. Shorter boards are nimble but less stable, while longer boards give a smoother ride. It’s all about comfort and matching the board to the kind of shredding you like most.
My Wrap
Longboarding is packed with opportunities for fun, adventure, and great outdoor experiences. Understanding its history, how longboards differ from skateboards, and picking a style that fits your personality makes shredding more rewarding from the start.
After picking out the right board, keep it in top shape, and follow key safety tips, that feeling of carving down a smooth road or dancing on a long deck is hard to beat. No matter how you ride, longboarding is about getting outside, having fun, and enjoying the ride, one push at a time.
Steve
Some links on this site may be affiliate links, and if you purchase something through these links, I will make a commission on them.
There will be no extra cost to you and, you could actually save money. Read our full affiliate disclosure here.