Kettlebell exercises are one of my favorite ways to get in a solid, full body workout at home or in the gym. With just a single kettlebell, you can work on strength, stability, mobility, and even cardio all in just a few moves. If you’re new to kettlebells, things might look a little intimidating at first, but these simple exercises make it easy to get started and build confidence.
You don’t need fancy gear or tons of space for a kettlebell routine. I always recommend starting with a moderate weight that you can safely control; most people do well with a kettlebell between 8kg (18 lbs) and 16kg (35 lbs). The best part is, you can scale these moves up or down based on your strength and comfort level. Unlike traditional weights, a kettlebell’s unique shape means you work your grip and stabilizing muscles a lot more, which gives a boost to athletic performance.
Below, I’ll share five easy kettlebell exercises that are beginner friendly, effective, and practical for almost any workout plan. You’ll also find tips on getting started, common mistakes to watch for, plus answers to questions I often hear from beginners. These steps should help you ease into kettlebell training and set yourself up for a safe, productive adventure with this next level cool fitness tool.
What You Need Before You Start
Before grabbing your kettlebell, make sure you have a clear, sturdy workout space. Give yourself enough room to swing and move around safely. I usually lay down a mat to protect the floor and help with grip. Wearing sneakers with good traction helps too. A mirror nearby can help you doublecheck your form as you learn.
Picking the Right Kettlebell
Start with a weight you can lift easily for at least 8 reps.
If in doubt, go lighter and focus on technique before increasing weight.
Check for smooth, comfortable handles without sharp edges.
Remember that kettlebells with wider handles are great for twohanded moves, while smaller handles suit single-handed exercises.
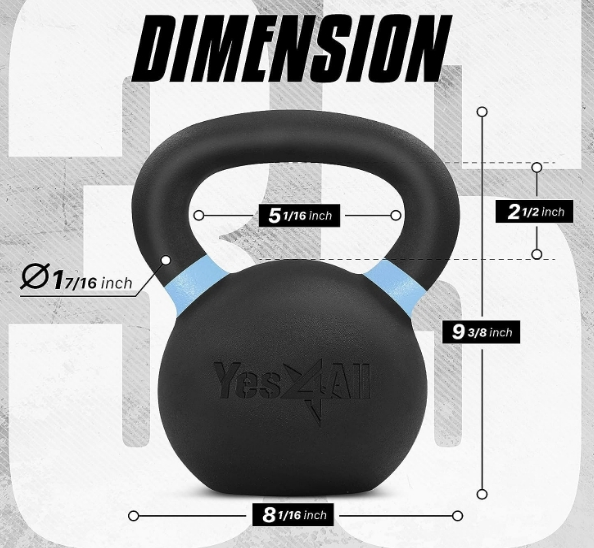
Quick visual guide
Warm Up First
A few minutes of light cardio (like jumping jacks or jogging in place) and some shoulder, hip, and torso stretches make a big difference. Kettlebell moves really get your whole body involved, so a good warmup helps you avoid injury and get better results. Try hip circles, arm swings, and lunges to prep your joints and get your blood flowing. Taking the time to warm up can even help you get more out of each exercise session.
My GoTo 5 Easy Kettlebell Exercises
I picked these five moves because they cover all the basics. You’ll get a mix of strength, balance, and flexibility work. Plus, you can mix and match for a quick circuit, or focus on just one or two if you’re crunched for time. Each move builds a good foundation for tougher kettlebell workouts in the future.
1. Kettlebell Deadlift
This is usually the first kettlebell move I teach because it helps you practice good hinge technique and builds strength in your glutes, hamstrings, and lower back. The deadlift also sets up your form for almost every other kettlebell exercise, so it’s worth mastering first.
Stand with feet about hipwidth apart. Place the kettlebell between your feet.
Push your hips back, bend your knees slightly, and grab the handle with both hands.
Keep your chest up, back flat, and shoulders pulled back.
Press through your heels, squeeze your glutes, and stand up straight, lifting the kettlebell. Lower it back with control.
Trainer tip: Think about pushing your butt back like you’re closing a car door, not bending at the waist.
2. Kettlebell Goblet Squat
If you’ve struggled with squats in the past, a goblet squat with a kettlebell can actually help with form. It works your quads, glutes, and core, and holding the weight in front helps you keep a straight back. This move can make traditional squats feel easier over time.
Hold the kettlebell by the horns (handles) close to your chest, elbows pointing down.
Stand with feet a little wider than hipwidth.
Sit back and down into a squat, keeping your chest lifted and knees tracking outward.
Go as low as you can without rounding your back, then push through your heels to stand.
Trainer tip: Keep your elbows inside your knees as you squat and avoid letting them flare out. With practice, you’ll increase your squat depth and strength.
3. Kettlebell Swing
The kettlebell swing is great for power, cardio, and developing your hip drive. This is the move you’ve probably seen that really puts kettlebells on the map. Remember, it’s a hinge, not a squat! Regular practice can give a boost to your grip strength and cardiovascular fitness in just minutes.
Stand with feet shoulderwidth apart, kettlebell about a foot in front.
Hinge at hips, grab the handle, and swing the kettlebell between your legs.
Powerfully drive hips forward, letting the bell swing up to about chest height (don’t use your arms to lift).
Let gravity bring it back down between your legs and repeat.
Trainer tip: Glutes and hips do most of the work here. Avoid using your lower back or shoulders to swing. Start with small swings, and work your way up to bigger, more powerful swings as your form improves.
4. Kettlebell Overhead Press
Pressing a kettlebell overhead builds strength and stability in your shoulders, triceps, and core. This move can be done with one arm at a time (which I prefer for balance), but you can also use two kettlebells if you’ve reached that level. The overhead press can help you spot imbalances in your left and right sides.
Hold the kettlebell at shoulder height with your palm facing in toward your body.
Brace your core and press the kettlebell straight up overhead until your arm is fully extended.
Lower it back to your shoulder with control.
Trainer tip: Keep your wrist straight and avoid shrugging your shoulder as you press. Try to press in a smooth, straight path rather than letting the kettlebell drift forward or back.
5. Kettlebell Row
This move works your upper back, arms, and core. It’s pretty handy for improving posture and strength for everyday lifting. Rows with a kettlebell can add some much needed pulling into your pull and push training days.
Rest your left knee and hand on a sturdy bench or chair, with your right foot on the floor.
Hold the kettlebell in your right hand, arm extended down.
Pull the kettlebell up toward your rib cage, keeping your back straight and elbow close to your body.
Lower it with control and repeat. Switch sides after your set.
Trainer tip: Pull your shoulder blade back first, then your elbow. Don’t yank with your arm alone. Focus on a slow, controlled motion to really dial in your back muscles.
Beginner Moves Kettlebell Video.
A straightforward and informative video that is well worth watching.
How to Structure Your Kettlebell Workout
A simple circuit is a great way to combine these exercises. Try doing 8–12 reps of each move, rest for 1–2 minutes, and repeat for 2–4 rounds. Listen to your body and adjust sets or reps to fit your fitness level. If you’re short on time, you can just choose three exercises and do two rounds for a solid 15minute workout.
Start with 2 rounds if you’re new to regular exercise.
Add a round as you get stronger or have more time.
Mix and match these with other bodyweight moves, like planks or mountain climbers, for extra variety. Changing up your routine every few weeks will keep things feeling fresh and help you track your progress over time.
Common Questions & Troubleshooting
How heavy should my kettlebell be?
Most people start with a kettlebell between 8–12kg (18–26 lbs) for women and 12–16kg (26–35 lbs) for men, but it depends on your experience and strength. If in doubt, use a lighter kettlebell until you’re comfortable with your form. Over time, you can work up to a heavier kettlebell as your technique and strength improve. Remember, it’s much better to go lighter and master the form before trying to lift heavier.
I feel it in my lower back during swings or deadlifts. Is that normal?
Some muscle activation in your back is okay, but if you feel pain or strain, check your form. Engage your core, hinge at the hips, and avoid rounding your back. A quick check in the mirror or a video can help you spot issues. If you keep feeling discomfort, try asking a coach or trainer for tips to perfect your technique. Working on core activation in side planks or bird dogs can also give a boost to your stability.
What if I don’t have a kettlebell?
You can substitute a dumbbell, a jug of water, or another household weight for many moves, though some (like the swing) feel best with the kettlebell shape. If you’re interested in kettlebell training, many gyms have sets available, or you can find a budget friendly option online. As you see the benefits, you might want to invest in a couple different sizes for greater flexibility.
Here is a link to check out my new Kettle Bell, the Yes4All
35lbs Kettlebell
Form & Safety Reminders
Breathe on the effort (exhale as you press, pull, or stand up).
Keep your core tight through every move.
Don’t rush. Good form beats speed every time.
Stay hydrated and cool down with some gentle stretching after your workout.
Be sure to put your kettlebell down safely after each set by using the deadlift motion instead of bending at the waist. This keeps your back safe and reinforces better movement habits.
Ready to Give It a Try?
Whether you’re new to kettlebells or just want some fresh ideas, these five exercises are a smart way to build strength and confidence. Start slow, focus on your technique, and have fun with it. As you get more comfortable, you can try heavier weights or more challenging variations. Kettlebell training is all about progress and personal wins—celebrate each step.
Your Action Steps:
Pick two or three moves and try one set today.
As your form gets better, add reps or another exercise.
Make kettlebell training a regular part of your routine, and enjoy the boost in strength and energy!
Got questions or want to share how it goes? Let me know; I’m always here to help out or suggest some next level cool kettlebell workouts to keep you motivated.
My Wrap
As you continue, remember that consistent practice leads to lasting progress. Give each exercise your best effort, and you’ll likely stumble upon new moves and exciting challenges along the way. Stick with it, and you’ll soon see the benefits in your everyday strength, energy, and confidence!
Steve
Some links on this site may be affiliate links, and if you purchase something through these links, I will make a commission on them.
There will be no extra cost to you and, you could actually save money. Read our full affiliate disclosure here.
There’s something beautifully mysterious about sound. We hear it, feel it, and in some cases, even heal through it. Across the ages, from ancient chants to modern sound therapy, people have explored the idea that sound vibrations could influence the body and mind.
But can sound actually disrupt cancer cells? Some believe the answer may lie in very specific sound frequencies, often referred to as high-frequency sound therapy or Rife frequencies.
These frequencies have gained attention in holistic health circles for their potential to break down the energy fields of abnormal cells, particularly cancer cells. The idea stems from the concept of resonance, the principle that everything vibrates at a certain frequency, including cells in the human body.
When a sound wave hits the natural frequency of a target object, like a glass or a cell, it can shatter or destabilize it. This theory led some researchers and alternative health pioneers to explore whether certain frequencies could target diseased cells without harming healthy ones
.
The Scientific Community
Although this sounds like something from a science fiction novel, it has caught the imagination of many people seeking complementary cancer therapies. One of the more recent studies in 2020 was published by Caltech and was about how it can selectively kill cancer cells.
A new technique could offer a targeted approach to fighting cancer: low-intensity pulses of ultrasound have been shown to selectively kill cancer cells while leaving normal cells unharmed.
Ultrasound waves—sound waves with frequencies higher than humans can hear—have been used as a cancer treatment before, albeit in a broad-brush approach: high-intensity bursts of ultrasound can heat up tissue, killing cancer and normal cells in a target area. Now, scientists and engineers are exploring the use of low-intensity pulsed ultrasound (LIPUS) in an effort to create a more selective treatment. Source; Caltech
From traditionally saying that sound frequencies are “out there ideas”, to next saying it can support chemo practices, it is now being looked at as a stand-alone technique.
Personally, I would feel much more comfortable having sound enter my body than chemicals
Alternative thoughts
Frequencies like 528Hz, often called the “love frequency,” are said to promote DNA repair and inner harmony.
The calming tones of 432Hz are thought to sync naturally with the universe’s rhythm and reduce anxiety, while 111Hz has been linked to heightened meditation states and cellular healing.
And many people report deep relaxation, mental clarity, and an increased sense of peace after using them regularly.
When you’re facing the emotional storm of illness, that sense of calm can be incredibly healing in its own right.
Generate Your Own: Sound Clip.
You can create and embed sound clips easily using free tools. Here are a few options:
Use their generators to layer 528Hz, 432Hz, and 111Hz tones.
Export the clip (if the site allows) or use a screen/audio recorder Like Audacity.
which can generate downloadable MP3’s. And then use your own tools to connect to better health.
My Wrap
What’s important to understand is that using healing frequencies is considered safe, especially as a non-invasive, supportive practice alongside medical care.
Whether you play them during meditation, sleep, or gentle movement exercises, these frequencies can offer an added layer of comfort and mindfulness and more than probably, healing.
As science continues to explore the intersection between vibration, biology, and healing, perhaps we’re just beginning to rediscover what ancient cultures always believed: that sound is more than just noise. It’s energy. It’s medicine. And it’s worth listening to.
Unlocking Athletic Power with Diaphragmatic Breathing
Let’s be honest—when we think about improving athletic performance, we tend to focus on the big-ticket items like training routines, diet plans, supplements, or gear. But there’s one powerhouse tool most athletes overlook: the breath.
It’s something we all do automatically, yet rarely think about. But when used with intent and proper technique, breathing becomes a secret weapon that can elevate your energy, muscle performance, endurance, and even your mental game.
Introducing Breath:
Your Secret Weapon
The way you breathe affects everything from how much oxygen your muscles receive to how calm or focused your mind is before a competition. Athletes often find themselves gasping for air during a hard run or losing form during a heavy lift—sometimes not because of fitness, but because of inefficient breathing.
Scientific studies back this up. A 2017 review in Sports Medicine found that respiratory muscle training improved both endurance and strength performance. Another study from the Journal of Applied Physiology showed that controlled breathing reduced perceived exertion during high-intensity workouts.
Even elite athletes like Novak Djokovic and Olympic swimmers like Michael Phelps credit focused breathing techniques for helping them stay centered and powerful under pressure.
So what’s the secret? Diaphragmatic breathing.
Mastering Diaphragmatic Breathing
Most people breathe shallowly, using their chest. But diaphragmatic breathing—also called belly breathing—draws air deep into your lungs using your diaphragm muscle. This method increases oxygen intake and stabilizes the core, making your movements more efficient and less fatiguing.
Here’s how to practice:
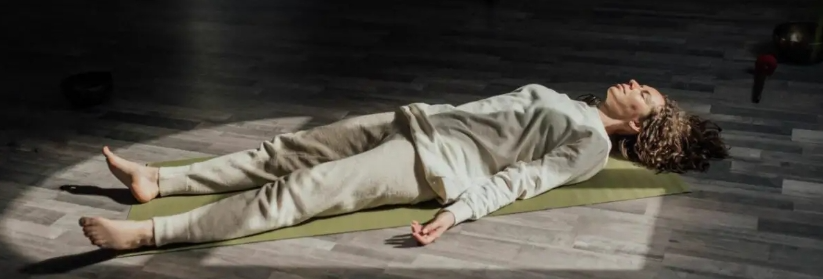
Lie on your back with one hand on your chest and one on your belly.
Inhale slowly through your nose. Your belly should rise, while your chest stays relatively still.
Exhale slowly through your mouth, tightening your core slightly as your belly drops.
Practice this for 5–10 minutes a day. Try incorporating it into your warm-up to calm nerves or cool-down to help recovery.
Benefits include:
Increased oxygen delivery to muscles
Better stamina and endurance
Improved mental clarity and reduced anxiety
Stronger core engagement (which also supports good posture and technique)
Breathing Strategies for Different Disciplines
Not all sports require the same breathing rhythm. Here’s how diaphragmatic breathing adapts:
Running: Sync breath with strides. Inhale for 3 steps, exhale for 2, adjusting as needed for pace.
Swimming: Use strong exhales underwater and deep inhales during brief breaks above water.
Cycling: Focus on exhaling completely to allow better oxygen exchange; aim for rhythmic patterns during climbs or sprints.
Strength Training: Inhale during the lowering phase, exhale powerfully during the push or lift to stabilize the core.
Facing pre-race jitters or training fatigue? Slow, deep breathing can reset your nervous system. Try box breathing—inhale for 4 counts, hold for 4, exhale for 4, hold for 4. Repeat for 2–3 minutes before a workout or event.
Breath isn’t just physical—it’s profoundly mental. Your breathing is one of the few automatic processes you can consciously control, and doing so gives you access to your body’s stress response.
Controlled breathing activates the parasympathetic nervous system, shifting you into a calmer, more focused state. This helps with:
Concentration during performance
Managing nerves and anxiety
Staying composed under pressure
Many athletes now include mindful breathing and visualization techniques in their routines. Picture yourself succeeding while controlling your breath—it activates both mental imagery and physical calmness, creating a strong mind-body connection.
Athletes like free divers, martial artists, and even NFL players now use these methods not just for performance, but for recovery and longevity.
Breathing for Peak Performance
How you breathe matters.
Switching from shallow, chest-based breathing to deep, diaphragmatic breathing can give you more stamina, sharper focus, and faster recovery. Whether you’re training casually or chasing a new personal best, better breathing can make your journey smoother—and more enjoyable.
Try this simple plan:
Start each day with 5 minutes of deep breathing
Integrate breathing into warm-ups and cooldowns
Practice specific techniques for your sport
Use breathing to reset when you’re stressed or fatigued
Want to learn more? Check out breathing resources like the books…
Alpha breathing is a simple, science-backed way to relax your mind and body. It’s about slowing down, breathing with intention, and helping your brain and nervous system switch into a calm state. Many people use it to tone down stress, sharpen focus, or just find a quiet moment in a busy day. I’ve found that once you get the hang of it, practicing alpha breathing truly feels like hitting a mental reset button.
Even if you’ve never tried breathing exercises before, alpha breathing is easy to learn and flexible. You don’t need any fancy gear—just a little time and a comfortable spot to sit or lie down. I’ll walk you through the basics, some handy tips for getting started, and ways you can adjust the practice to suit your own style and schedule.
If you’re after a super practical way to get more peace of mind, alpha breathing is definitely worth checking out. Let’s jump into how to get started, step by step.
Step 1: Get Set Up for Alpha Breathing
Before you get into the technique, it really helps to set yourself up for a smoother session. Comfort plays a big role; alpha breathing works best when you’re not distracted or feeling fidgety. You want your environment and body to be ready for relaxation and focus.
Basic Setup Tips:
Choose a quiet space where you can relax for a few minutes undisturbed.
Wear comfy clothes so you aren’t restricted in any way.
Sit upright in a chair with your feet on the floor, or lie down if that’s easier. Keep your back straight but relaxed.
If possible, dim the lights or shut your eyes to help block out distractions.
I like to put my phone on silent and give anyone around me a heads up that I’ll be unplugged for a little bit. These small things help you be present and get the most out of your alpha breathing practice.
Step 2: Understand the Core of Alpha Breathing
Alpha breathing is built on slow, rhythmic breathing cycles that are a bit longer and more deliberate than your regular breath. This technique taps into your body’s natural calming system, which can help tone down stress hormones and pull your mind into a quieter state. The name “alpha” comes from alpha brain waves, which tend to show up when you’re both relaxed and alert, like when you’re daydreaming or enjoying a peaceful moment.
How Alpha Breathing Works:
Breathe in slowly and deeply through your nose for about 4-5 seconds.
Hold your breath for another 4-5 seconds. Don’t force it—just stay comfy.
Exhale even more slowly through your mouth for 6-7 seconds.
Pause briefly at the end of your exhale, then repeat the cycle.
Keeping a regular rhythm is the key. Imagine the gentle pattern of waves coming and going, helping your mind get in sync with relaxation.
Step 3: Start Practicing with a Simple Routine
If you’re new to this, starting with just a few minutes of practice makes it easier to stick with. Aim for about five minutes of alpha breathing to see how it feels, and lengthen the time as you get more comfortable.
Basic Routine Example:
Sit or lie down, close your eyes, and focus on your regular breath for a moment.
Breathe in through your nose for 4 seconds. Let your belly expand instead of your chest.
Pause with full lungs for 4 seconds—keep your shoulders relaxed.
Exhale smoothly through your mouth for 6 seconds. Let tension drop away.
Pause with empty lungs for 2-3 seconds, feeling the calm between breath cycles.
Repeat this for 10-15 cycles, or about five minutes.
If your mind drifts, don’t stress—gently bring your attention back to your breath. Over time, this practice helps you center your thoughts more easily, even when you’re distracted.
Step 4: Fine-Tune and Personalize Your Practice
Everyone has different lung capacity, energy, and daily routines, so it’s good to adjust your breathing method to suit your own needs. The real power comes from making the practice practical and accessible for your unique lifestyle.
Easy Ways to Make Alpha Breathing Your Own:
If 4-4-6 feels off, try a 3-3-5 or 5-5-7 pattern until you find a rhythm that works.
Add relaxing elements like soft music, nature sounds, or a timer to help you settle in.
Use alpha breathing before stressful events—like meetings or tests—or whenever you feel rushed. You only need a minute or two to reset.
Pair your breath with a calming phrase in your head, such as “calm” or “let go” on the exhale.
I’ve even practiced alpha breathing on a busy bus by turning my focus inward and running through the rhythm. Most people won’t even notice you’re practicing an effective relaxation tool.
Step 5: Stick With It and Build a Habit
Being regular matters most when it comes to getting the good stuff out of alpha breathing. When you practice consistently, it’s easier to call on that sense of calm exactly when you need it. Over time, you’ll likely notice a bigger difference in your day-to-day stress and focus levels.
How to Build the Habit:
Practice alpha breathing at the start or end of your day for a calming routine.
Link alpha breathing to a daily action, such as after brushing your teeth or before sitting down to work.
Set reminders for yourself—your phone’s a great tool for this, as are sticky notes.
Track your sessions in a notebook or app so you can look back at your progress or spot patterns over time.
I’ve found that a short session after lunch really helps shake off that classic afternoon slump. You can play with timing to see what fits your own schedule best.
Common Questions & Troubleshooting
What if my mind keeps wandering?
This is super common, especially when you’re first getting started. Just notice where your mind went, and kindly redirect your attention to the feeling of your breath. It gets easier over time to stay focused.
Is it normal to feel lightheaded?
Sometimes, folks get a bit lightheaded with slow breathing—especially if you’re not used to it. Make sure you’re not forcing or holding your breath too long. If it keeps happening, shorten the breathing phases and let your breath flow naturally.
Can kids or older adults do alpha breathing?
Definitely. You can easily adjust the routine for comfort and age. Make the breath cycles gentle, and skip the holds if that feels better.
How quickly will I see results?
Most people feel calmer after just one session. If you keep at it, you’ll likely find that managing stressful triggers throughout your day becomes more natural.
Tips for Getting More from Alpha Breathing
Try alpha breathing with gentle movement, like stretching or yoga, to seriously boost your relaxation.
Check your stress level by rating it from 1-10 before and after each practice. You may spot some interesting trends.
Blend in a little mindfulness—focus on a single sound, a candle flame, or even just the feeling of air moving past your nostrils as you breathe.
With consistency, alpha breathing can become your go-to skill to help you relax, reset, or wind down whenever you need it. Feeling calm and centered is an incredibly valuable asset—especially on busy or stressful days.
Your Action Plan:
Pick a specific time this week to try alpha breathing; morning, after lunch, or before bed are all good options.
Set a timer for five minutes so you’re not keeping one eye on the clock.
Experiment with different breath lengths until you find what feels smoothest for you.
Note how you feel before and after each session as a personal reference.
Give alpha breathing a shot—you might be surprised at how quickly you can find a pocket of peace, even on the most hectic days. And if you come up with your own creative twists or find it helpful, let friends or family know; sharing what works might just help someone else discover a little calm, too.
Eight years ago, I had an emergency bowel operation for cancer, and during the operation I saw my Deceased Grandfather… a pretty wild start to my ongoing cancer journey.
I have heard of these things happening, but I put it down to the mind and body trying to cope with pain or drugs. And they had me pumped up with morphine, however I swear I saw him and then heard him saying you have to go back … and I came back.
I was in a Vietnamese hospital, and no one really told me what happened, however an 8-hour operation turned into a 16–17-hour operation. But I survived, and that was my first cancer battle.
In some ways it was mentally a lot easier because I had very little time to panic or even think about it as my surgery happened within 24 hours. This was because I had no idea what was wrong with me and thought it was just constipation. I was told one more day and I wouldn’t have made it into surgery. So, it was straight into the operating theatre with no time to contemplate my navel.
Current Diagnosis
But this time is different. I am still in Vietnam and have been monitored over the years and unfortunately it is back in my liver. I think of it as a little goblin, but not the cute ones, these are vicious drunken bastards.
My new challenge is a 3cm growth in my liver. The doctors want to wait. I want to act. Although the first round of doctors wanted to go full steam ahead, my specialist advised waiting for a month.
OK with me because I am freaked out about chemotherapy because my Mum had cancer at the same age I am now, and that shite killed her quicker than cancer.
30-day reprieve
I get a 30-day reprieve to turn things around using research, exercise, nutrition, and alternative medicine. Even if it doesn’t work straight away, I am not taking chemo or having radiotherapy. I am no doctor, but I haven.t heard much long -term success coming from either treatment. By all means, if you know better, let me know.
So jump on board and subscribe to my channel and see if I can defeat these nasty little goblins. I look at this as an exercise in exploring other options than the normal hospital led treatment of which I have become very skeptical about.
My Action Plan
It is just as important to say the things I will be leaving out of my diet. Specifically processed foods, alcohol, vegetable oils, sugar, bread, pasta and more as I continue updating my dietary knowledge.
And the things I will be adding to my diet will all be based on detoxing my liver. For example, fresh fruits and vegetables with a good range of protein to keep me built up and fighting fit. I will talk about my diet in more detail in the weeks ahead.
Exercise is also very important, and I need to lose 15 kilos as quick as possible as the extra weight is putting stress on my liver. Luckily, I have already been doing two hours of weights a day, and that is being added to already with swimming, walking and Tai Chi.
My goal is to burn an extra 1,000 calories per day. Pair this with a calorie-controlled liver-friendly diet and I plan to lose at least10kg over the next month. I have already lost 3 kilos in the first week, so as long as I stick to my diet and exercise regime I should be able to manage this.
If my dieting is successful and I can cope with reducing my food intake I will take it to the next level and introduce fasting as there have been studies showing that fasting triggers autophagy. this is the body’s natural clean-up system, removing damaged cells along with some research suggesting it includes cancer cells too.
But I won’t be stopping there. Other things I will try are, using Ivermectin which is a repurposed anti parasitic drug. And I cannot find it in Vietnam, but there is a similar product I can buy over the counter. But I don’t want to recommend or even mention it until I use it and make sure there are no side effects.
High frequency sound therapy, Mistletoe therapy, which is popular in Germany and Switzerland, along with grounding will all play a part in my approach to recovery.
Yes, I am throwing a lot into the game plan and hopefully one or all will work. The more research I do, the more it seems like these remedies have been kept from us so we lose the control of our own bodies.
Research and Record
I will be breaking all these things down into YouTube videos with the next video documenting what I do each week.
I am grateful this delay has given me time to think about the options facing me. And even if It gets to the worst-case scenario, I intend to stay positive.
And I really hope my struggle, while not being unique, will help a few others in deciding how to fight their battles, whichever way they choose to go.
Being diagnosed with cancer turns your world upside down. It’s not just the physical battle that begins—it’s the emotional one too. From the moment you hear the word “cancer,” your mind starts spinning with fear, confusion, and uncertainty. Some days, you may feel strong and ready to take on the world. Other days, you might not want to get out of bed. And that’s completely normal.
Coping with the mental challenges of cancer isn’t about being positive all the time—it’s about giving yourself space to feel, and then finding healthy, helpful ways to shift those feelings so you can keep moving forward.
The Emotional Rollercoaster
One of the hardest parts of cancer is the unpredictability—not just of the disease itself, but of your emotions. You might feel hopeful in the morning and overwhelmed by fear by afternoon. You may grieve the loss of your old life, your energy, or your plans. Guilt, anger, sadness, anxiety—they can all show up uninvited, and sometimes all at once.
It’s important to know this is not weakness. This is human.
What matters most is not suppressing those feelings but learning how to process them and return to center. Everyone’s emotional healing journey is different, but here are some techniques and ideas that can help you through the darkest moments.
Coping Strategies for the Tough Days
1. Name It and Feel It
When you feel down, don’t force yourself to “snap out of it.” Instead, name what you’re feeling. “I feel scared.” “I feel helpless.” “I feel angry.” Giving your emotions a name can help you separate them from who you are and see them as passing states, not permanent realities.
2. Start Small and Take Action
Even the smallest actions can restore a sense of control. Make your bed. Take a short walk. Water a plant. Journal for five minutes. These tiny wins build momentum and remind your mind and body that you’re still here, still trying, still living.
3. Connect with Others
Don’t isolate. Talk to someone, a friend, a fellow cancer patient, a support group, a counselor, or even your pet. Sharing what you’re feeling doesn’t make you a burden; it often lightens your load. Sometimes, just hearing “I get it” from someone who truly understands is a form of medicine.
4. Limit Negative Input
Some days, it’s better to unplug. Limit your exposure to distressing news or social media. Instead, watch a comforting film, listen to calming music, or read something uplifting. Surround yourself with gentle content that nurtures your spirit.
5. Practice Gratitude and Visualization
It might sound like a cliché, but gratitude really helps reframe your mind. Try writing down three things you’re grateful for each day, however small. Visualizing moments of peace or healing in your body can also help shift your energy from fear to hope.
Turning Fear into Focus
Cancer can feel like an enemy living inside you, but some people find strength by shifting that narrative. Instead of seeing yourself as under attack, try viewing your body as a battlefield, and your mind as the general, directing healing energy. This mental shift turns passive fear into proactive intention.
Ask yourself:
What can I do today that supports healing?
What do I need to feel stronger?
Who can I turn to for support?
Even if the answers aren’t perfect, simply asking the questions invites hope.
Growing Through the Experience
Though cancer is a brutal teacher, it also often leads people to re-examine their lives. Many survivors say they became more mindful, more appreciative, and more connected to what really matters. It’s okay to cry, to break, to question everything. But in those cracks, new light can enter.
Let yourself be transformed—not just by the illness, but by your courage to meet it head-on, day by day.
You are not your diagnosis. You are still you—still worthy, still valuable, still capable of joy. And every breath, every choice, every moment of reaching for something better is a quiet but powerful act of resistance against despair.
Steve
Some links on this site may be affiliate links, and if you purchase something through these links, I will make a commission on them.
There will be no extra cost to you and, you could actually save money. Read our full affiliate disclosure here.
I am undergoing my own cancer journey, and I hope sharing some of the things I do help others in their fight against this as well.
I find that I have days when I feel “down” and just want to cut myself off from the world, stay in bed and generally feel sorry for myself. One thing that works for me is practicing my breathing techniques which calm me down.
5 Simple Breathing Exercises for Stress Relief and Cancer Support
When facing cancer, whether it’s active treatment, recovery, or simply living with the uncertainty of it all, one of the most underestimated tools for healing and well-being is something you already have: your breath.
Breathing exercises are simple, free, and scientifically proven to help reduce stress, lower anxiety, improve oxygenation, and even support immune function, key elements in cancer care.
In this blog, we’ll explore the science of how breathing impacts your health during cancer treatment and share five beginner-friendly exercises you can start today.
Understanding the Science
How Breathing Helps in Cancer Treatment
Breathing is not just a mechanical act. Conscious, controlled breathing taps into the parasympathetic nervous system, also known as the “rest and digest” mode. This counters the body’s fight-or-flight response, which is often in overdrive during illness.
A 2014 study published in Psycho-Oncology found that cancer patients who practiced mindful breathing and meditation had significantly reduced anxiety and depressive symptoms compared to control groups. Another study in Integrative Cancer Therapies (2017) concluded that slow, deep breathing improved quality of life and reduced fatigue in breast cancer patients undergoing chemotherapy. Furthermore, a 2021 paper in Frontiers in Psychology demonstrated how breathing exercises helped regulate inflammatory markers, such as cytokines, which are often elevated during cancer treatment.
These findings suggest that breathing isn’t just about calming the mind—it actively supports the body’s internal healing mechanisms.
Benefits of Breathing Exercises for People Living with Cancer
Reduces anxiety and fear Regulated breathing helps you stay calm and centered in moments of uncertainty.
Improves sleep quality Deep breathing before bed can reduce insomnia—a common side effect during cancer treatment.
Supports immune function Deep breathing reduces stress-induced inflammation, which can help the body fight off illness more effectively.
Improves oxygen delivery Optimal breathing enhances oxygen supply to tissues, vital during healing and recovery.
Enhances digestion and detoxification Activating the parasympathetic system aids digestion and liver function, both critical in managing chemotherapy side effects.
5 Easy Breathing Exercises for Daily Use
These exercises are gentle and safe for nearly all physical conditions. Begin slowly, especially if you feel dizzy or fatigued, and build your practice gradually.
1. Box Breathing (Square Breathing)
How to Do It:
Inhale through your nose for 4 seconds
Hold your breath for 4 seconds
Exhale slowly through your mouth for 4 seconds
Hold again for 4 seconds
Repeat for 4–5 minutes
Benefits: Balances the nervous system and improves focus. Used by Navy SEALs for stress regulation.
2. 4-7-8 Breathing
How to Do It:
Inhale through your nose for 4 seconds
Hold your breath for 7 seconds
Exhale through your mouth for 8 seconds
Repeat for 4 cycles (increase gradually as comfortable)
Benefits: Induces a deep state of relaxation. Excellent for pre-sleep or during anxiety spikes.
3. Pursed-Lip Breathing
How to Do It:
Inhale slowly through your nose for 2 counts
Purse your lips (like blowing out a candle)
Exhale slowly through your mouth for 4 counts
Repeat for 3–5 minutes
Benefits: Improves oxygen exchange and strengthens the lungs. Great during chemo when breathing feels shallow.
4. Diaphragmatic Breathing (Belly Breathing)
How to Do It:
Sit or lie down comfortably
Place one hand on your chest, one on your stomach
Inhale deeply through your nose, expanding your belly (not your chest)
Exhale through your mouth slowly
Practice for 5–10 minutes
Benefits: Strengthens the diaphragm, improves lung capacity, reduces stress, and supports digestion.
5. Alternate Nostril Breathing (Nadi Shodhana)
How to Do It:
Sit upright and use your right thumb to close your right nostril
Inhale through your left nostril
Close the left nostril with your ring finger, release the right
Exhale through the right nostril
Inhale through the right, switch, and exhale left
Repeat for 3–5 minutes
Benefits: Balances energy, clears mental fog, and supports emotional equilibrium. Known in yoga for harmonizing the brain’s hemispheres.
Consistency is key. Try starting with one of the above exercises each morning or before bed. Even 5 minutes a day can make a difference. You can also use breathing as a “reset button” throughout the day when anxiety, fatigue, or fear creep in. Set reminders, pair it with music, or integrate it into meditation.
Scientific Support
Mindfulness-Based Stress Reduction for Breast Cancer Survivors: A Systematic Review and Meta-analysis Psycho-Oncology, 2014 DOI:10.1002/pon.3500
Breathing Exercises in the Treatment of Chemotherapy-Induced Fatigue and Anxiety Integrative Cancer Therapies, 2017 DOI:10.1177/1534735417729605
The Psychophysiological Mechanisms of Breathwork in Cancer Care Frontiers in Psychology, 2021 DOI:10.3389/fpsyg.2021.624254
Final Thoughts
You don’t need expensive equipment or complicated techniques to take back a sense of control over your body and mind.
Breathing exercises are a gentle yet powerful way to build resilience, reduce fear, and support healing.
In a time when so much feels uncertain, your breath is your anchor, a reminder that healing happens one inhale, one exhale at a time.
Steve
Some links on this site may be affiliate links, and if you purchase something through these links, I will make a commission on them.
There will be no extra cost to you and, you could actually save money. Read our full affiliate disclosure here.
I often get asked about the best wearable for health tracking and smart features, and I see many people debating between the Whoop 5.0 Health Band and the Apple Watch Series 10.
Both have dedicated fans and some cool technology under the hood, but they show up very differently on your wrist and in your daily life.
The Whoop 5.0 is designed almost entirely around health, recovery, and performance insights.
The Apple Watch Series 10, on the other hand, brings together health tracking with an all-in-one smart-watch experience, including apps, notifications, and more.
If you’re looking to make a choice between these two, I’ll break down what makes each one unique, where each stands out, and in which scenarios I find each one better suited.
Device Overviews
What is the Whoop 5.0 Health Band?
The Whoop 5.0 is a health and fitness wearable that puts a spotlight on tracking your body’s daily strain, recovery, and sleep. It has no screen, so all your stats run through the app. The focus here is on athletic and recovery metrics rather than features like texting or music control.
People who want super detailed fitness, recovery, and sleep data
Athletes or anyone who trains regularly and likes seeing detailed wellness trends
Those who don’t need distractions from notifications or apps
Whoop 5.0 Pros & Cons
Pros:
Focuses on deep biometric data and recovery tracking
Battery lasts almost a week per charge
Subscription includes insights, coaching tips, and historic data
Cons:
Requires a monthly or annual subscription to access features
No screen for at a glimpse updates or time
Lacks traditional smartwatch functions
What is the Apple Watch Series 10?
The Apple Watch Series 10 is a full featured smartwatch that also packs in robust health and activity tracking. It can run apps, show notifications, track heart rate, and even detect irregular rhythms, but it’s also designed for daily productivity, entertainment, and staying connected.
People who want a balanced mix of health tracking and smart functions
iPhone users who rely on connectivity, messaging, and all day use
Users interested in a screen for instant info and control
Apple Watch Series 10 Pros & Cons
Pros:
Loaded with health, fitness, and safety features
Works as a Mini extension of your iPhone
Has an always on display for time, alerts, and quick checks
Cons:
Needs almost daily charging
Can become a distraction with constant notifications
Expensive, especially for top tier configurations
Main Feature Comparison
Health and Fitness Tracking
Why It Matters: For many, detailed health data and reliable fitness stats are the big draw for a wearable.
Whoop 5.0: Tracks heart rate variability (HRV), sleep cycles, recovery, and daily strain. It uses this data to suggest rest, training intensity, and even habits affecting recovery. There’s no workout GPS, but it excels at day-to-day body measurement.
Apple Watch Series 10: Tracks activity (steps, calories), heart rate, ECG, blood oxygen, and sleep. It also provides motivational rings for movement and integrates with workouts for GPS mapping.
My Take: The Whoop 5.0 feels stronger for people obsessed with recovery and performance. The Apple Watch gives a more well-rounded if slightly less deep view, especially for casual users.
Smart Features
Why It Matters: Connection with your phone, apps, and the rest of your tech life can make a device much more useful.
Whoop 5.0: No screen and no smart features, focused entirely on health tracking through the mobile app.
Apple Watch Series 10: Handles calls, messages, Apple Pay, music, calendar, and much more. Also supports third party apps.
My Take: I find the Apple Watch Series 10 is a better fit for anyone wanting full smart watch features and extra convenience.
Battery Life
Why It Matters: Longer battery life means less interruption for charging.
Whoop 5.0: Lasts roughly five days per charge, often more if you’re not syncing too often.
Apple Watch Series 10: Usually needs charging every one to two days, depending on use and display settings.
My Take: I rely on the Whoop 5.0 for extended wear, but the Apple Watch wins on convenience if you’re already charging your phone daily and like quick top-ups.
Subscription & Pricing
Why It Matters: Ongoing costs can add up fast.
Whoop 5.0: The hardware comes free or discounted with a required subscription starting around $30/month for full access.
Apple Watch Series 10: Requires a higher upfront cost for hardware but doesn’t have a monthly fee for core tracking. Some premium health features may tie in to Apple Fitness+ for a fee, but standard wellness tools are included.
My Take: If you dislike subscriptions, the Apple Watch makes more sense. The Whoop costs more over time but gives a niche experience for serious athletes.
Comfort and Design
Why It Matters: A wearable is only helpful if you forget it’s there or love to wear it.
Whoop 5.0: Thin, flexible, and screenless. Easy to wear 24/7 and goes unnoticed while sleeping.
Apple Watch Series 10: Larger and heavier, though it looks great as a tech accessory.
My Take: I find the Whoop easier for all day and overnight wear. The Apple Watch feels more stylish and customizable if you enjoy switching bands or matching outfits.
User Opinions and Reputation
Whoop 5.0: Generally loved by athletes and users who want pure data and detailed recovery stats. Some dislike the required subscription.
Apple Watch Series 10: Popular among a broad audience for its wide functionality. Users praise the convenience but some wish for deeper health metrics or longer battery.
Overall Reputation: The Whoop is praised for fitness focus, the Apple Watch for versatility and connectivity. I see them each recommended for different types of users, depending on what matters most to you.
Which One Makes Sense for You?
Choosing between the Whoop 5.0 and Apple Watch Series 10 really depends on your daily habits and what you actually want from a wearable.
If your main priority is deep insight into your health and you like the idea of a distraction free device, the Whoop is probably the right fit.
If you want a companion to your iPhone and a multipurpose device for both work and wellness, the Apple Watch fits that need easily.
Go with Whoop 5.0 if you:
Train hard and care about recovery and sleep analysis
Don’t want a screen or extra distractions
Are fine with a subscription for better coaching and insights
Go with Apple Watch Series 10 if you:
Want a true smart watch that does everything your phone can do on your wrist
Prefer a screen and notifications right on your wrist
Are already part of the Apple ecosystem
Final Decision
I’ve used both devices and think there are good reasons to recommend each to different types of people. Your choice really comes down to which features you’ll actually use each day and how you want your wearable to fit into your life.
Careful thought helps make an informed decision that won’t leave you with buyer’s regret. Consider how each device meshes with your style, fitness habits, and technology preferences so you walk away happy with your choice. Whichever one you pick, you’re sure to set your health and daily routine up for a boost.
Steve
Some links on this site may be affiliate links, and if you purchase something through these links, I will make a commission on them.
There will be no extra cost to you and, you could actually save money. Read our full affiliate disclosure here.
Building up to a 7 day fast isn’t something most can just jump into on a whim. Going an entire week without food can test your willpower and your body’s limits, but with the right mental prep and physical buildup, it’s absolutely possible. My personal experience has shown me that getting ready for a lengthy fast takes careful planning, listening to your body, and setting yourself up for a smoother experience overall.
Jumping straight into a weeklong fast usually leads to burnout, headaches, and a generally tough time. Preparing your body slowly can make things a lot easier, and you’ll likely skip past many of the struggles people hit when they rush the process.
This guide lays out every stage of prepping for a 7 day fast—from early mindset shifts, to step by step physical changes, and making sure you’re approaching it safely. Whether you’re curious about fasting for health, mental clarity, or simply want to challenge yourself, you’ll find clear advice here that makes the whole thing doable and a lot less intimidating.
Step 1: Set Your Fasting Goals and Understand the Why
You’ll want to get clear about why you’re interested in a 7 day fast right from the start. Some people want to reset their digestive system, while others are looking for mental clarity or a spiritual experience. With a tough challenge like this, having your reasons top of mind helps you push through when hunger hits.
Questions to Ask Yourself Before Fasting:
What do I want to achieve by completing a 7 day fast?
Is my main goal physical, mental, or spiritual?
Have I talked to a doctor to make sure fasting is safe for me?
How will I measure my success during and after the fast?
Common Benefits People Seek:
Better digestion or gut reset
Sharpened focus and mental clarity
A sense of accomplishment or discipline
Spiritual growth or time for reflection
Keeping your goals front and center gives you motivation when things get tough, and helps you notice any positive changes in how you feel or think.
Step 2: Prepare Your Body with Shorter Fasts
Going right from your regular eating pattern to a 7 day fast is rarely a smooth experience. The best game plan I’ve found is to train your body with shorter fasts first, so you can get used to hunger cues and feel more confident as the big week approaches.
How to Work Up to a 7 Day Fast:
Intermittent Fasting (16:8 or 18:6): Try eating only during an 8 hour window—like noon to 8 p.m.—for a week or two. This builds your fasting “muscles.”
24 Hour Fasts: Go a full day without food once or twice a week. Water, herbal tea, and black coffee are usually fine. These help your body switch up into burning stored energy instead of relying on fresh meals.
Extended Fasts (36-48 Hours): Once you’re comfortable with 24 hour fasts, try an overnight and full day stretch. Pay close attention to how you feel. Headaches and tiredness are common at the start, but your body tends to adjust after a couple tries.
Each time you complete a short fast, you’ll get familiar with what real hunger feels like, what’s just a habit, and how your body reacts. This is super important before jumping into a longer stint.
Step 3: Plan Your Transition Week
Your last week before starting a 7 day fast should focus on making the switch gentle to give your body a head start. Abrupt dietary changes can make you feel lousy, but a slow taper down in eating softens the transition.
Transition Tips That Really Help:
Gradually Reduce Calories: Eat lighter meals and smaller portions as you get closer to Day 1.
Cut Out Processed Foods and Sugar: Base your meals around veggies, clean protein, and healthy fats. Dropping sugar helps keep your blood sugar steady and stops wild cravings during the fast.
Go Easy on Carbs: Cutting back on carbs helps your body begin using fat as fuel, which can make the fast much easier compared to the heavy “carb hangover” feeling some people get.
Hydrate Well: Drink plenty of water every day and cut down on caffeine to prevent dehydration when fasting.
This transition week lays the groundwork for success, so your metabolism isn’t shocked when food vanishes and cravings are far less intense than they’d otherwise be.
If you want to track measurable changes, jot down notes on your energy, mood, and any physical symptoms. This can help you spot patterns and tweak your approach for next time. Many folks find this period useful for prepping mentally too—set up a few positive affirmations or reminders as you phase in the new routine.
Step 4: Gather Your Supplies and Set Up Support
I always make a checklist in the week leading up to a long fast to stay stress-free. Chasing down tea, salt, or a water bottle when you’re already hungry is no fun. Setting up support circles also helps—having someone check in or joining a fasting group keeps you focused and motivated.
What to Have Ready:
Electrolytes: Sodium, potassium, and magnesium keep headaches, dizziness, and muscle cramps far away.
Herbal Teas and Black Coffee: These can help with hunger and provide a little boost in the middle days when energy dips.
Filtered Water: Trust me, you’ll want plenty of clean water on hand at all times.
Distractions: Books, puzzles, or light walks to keep your mind off cravings when they show up.
Good Support Systems:
Tell a friend or partner what you’re doing
Check out online fasting forums for advice and encouragement
Schedule extra rest—some people feel more tired than usual during an extended fast
With the right setup and support, you’ll stay positive and on track, even during days 4 and 5 when it can get tough. Some people even use journaling or guided meditation for added encouragement.
Step 5: Know What to Expect During the Fast
A 7 day fast comes with plenty of ups and downs. Being aware of what’s normal makes the adventure much smoother and less stressful overall. Here’s what I often go through and what you might stumble upon:
Common Reactions to Look Out For:
First 48 Hours: Hunger and irritability may show up early; these usually drop off after day 2.
Fatigue and Mood Swings: Rest helps. Some folks experience strong bursts of energy, while others feel like napping much more than usual.
Mental Clarity: After day 3, many people (including me) notice a sharper mind and steady focus. It’s pretty next-level cool.
Electrolyte Shifts: Stay on top of your salt and minerals so headaches and muscle cramps don’t sneak in.
If symptoms get intense—like dizziness, heart palpitations, or confusion—it’s smart to stop and ask a health professional. Safety needs to be your top priority.
Some extra advice: plan simple activities during your fast, such as stretching, daily walks, or catching up on reading. Avoid strenuous exercise and stick to your usual sleep schedule. Stay alert about your body’s signals, and don’t be shy about reaching out for help if anything feels off.
Step 6: Break Your Fast Thoughtfully
The refeeding process after a weeklong fast is just as important as the fast itself. Shocking your system with a big meal can be really tough on digestion or leave you feeling pretty uncomfortable.
How to Safely Break a 7 Day Fast:
Start Slow: Begin with light, easy to digest foods—think broths, diluted juices, or lightly steamed veggies.
Ease Into Meals: Gradually increase portion sizes and add more complex foods over the next two to three days.
Keep Hydrated: Drink plenty of water and small amounts of drinks rich in electrolytes.
I’ve found that being patient really pays off here—my energy is steadier, and digestion feels way better when you ease back into eating slowly.
It helps to log what you eat when breaking your fast. This not only helps you avoid unpleasant symptoms, but also lets you pinpoint which foods best support your recovery.
Troubleshooting and Common Questions
Is fasting safe for everyone?
No, fasting isn’t suitable for everyone. People with certain medical issues (like diabetes, eating disorders, or pregnancy) should avoid extended fasts unless a doctor says it’s okay.
How do I handle extreme hunger or cravings?
Stay hydrated, go for a walk, or distract yourself with an activity you enjoy.
Remind yourself of your goals and your reason for starting.
If hunger doesn’t fade after a few days, consider breaking the fast carefully.
What if I get a headache?
Try a pinch of salt in your water or sip herbal tea. Often headaches are tied to an electrolyte gap or mild dehydration—simple fixes usually help.
Some people experience sleep troubles or mood swings during their first long fast. Make rest a priority and use relaxation techniques, like breathing exercises, to keep stress at bay. If you’re not feeling better after these steps, it’s wise to talk to your healthcare provider.
Your Fasting Action Plan
Clarify your goal and check with a healthcare professional if you have any doubts.
Build up with shorter fasts over several weeks.
Plan your transition week and pull together all your supplies.
Set up a support system to keep your motivation topped up.
Listen to your body and make adjustments as you go.
With patience and a steady build up, a 7 day fast becomes much more manageable. You might even find it changes your perspective on food and willpower and health for the better.
Steve
Some links on this site may be affiliate links, and if you purchase something through these links, I will make a commission on them.
There will be no extra cost to you and, you could actually save money.
Kindle has completely changed the game when it comes to accessing fitness knowledge. Why haul around hefty books when you can have a library of fitness wisdom right in your pocket? Kindle’s flexibility means you can flick through pages during a break at work or while relaxing at home. It’s like having a personal trainer on standby, available whenever inspiration strikes.
Exercise books on Kindle compile the insights of fitness experts from all over the world. These books cut through the clutter and offer tested tactics instead of just gimmicky advice. They lay out clear frameworks for building a routine that suits your lifestyle. This isn’t about following a cookie-cutter plan; it’s about grasping foundational principles and adjusting them to fit your schedule.
The mix of text, images, and sometimes interactive content makes learning these exercises engaging. The true beauty lies in Kindle’s portability. Imagine accessing a new workout plan or revisiting an inspirational passage while on vacation or at the gym. The digital convenience means your fitness guide is only a swipe away.
Each book is a stepping-stone on your fitness journey. Embrace the opportunity to learn, adapt, and grow healthier. Kindle isn’t just a bookshelf; it’s a gateway to a fitter you, where the possibilities to improve are endless.
And the best thing is once you have purchased the “Kindle Scribe” there re so many free downloads it saves you money in the long run.
Here are my 5 best choices for Exercise books on kindle.
Starting a fitness routine can feel like standing at the foot of a mountain. ‘Bodyweight Exercises for Beginners’ makes it feel more like a gentle hill climb. This book is the ultimate guide for folks new to exercise, written by an expert who knows their stuff.
This book breaks down basic exercises that don’t require fancy equipment. Think push-ups, squats, and lunges, but with variations and tips that make them doable and effective. You learn proper form, which is super important to avoid injuries and make each move count.
Tailored routines make sure you’re not overwhelmed. It introduces step-by-step plans catering to different levels, so you’re always challenged but never out of your depth. No gym membership is needed here—just a bit of space and some motivation to get moving.
Whether you’re at home, traveling, or outside enjoying the sunshine, these bodyweight exercises fit right into your life. It’s about creating a foundation that helps in everyday life, making you stronger, more flexible, and ready to take on more advanced fitness challenges.
For those stepping into the world of strength after 40, ‘Strength Training Over 40’ is a gem. With the author’s experience and relatable tone, the book demystifies something many find intimidating.
The manual emphasizes how strength isn’t about bulging muscles for everyone. It’s about building resilience and vitality. The routines are crafted to cater to different experience levels. You won’t find a one-size-fits-all regime here.
The author shares insights on how these strength exercises help in daily tasks, enhance bone density, and generally improve quality of life. Suddenly, that heavy grocery bag or hike up the stairs feels like no big deal.
Intertwined throughout are stories from real people who have benefited from the routines. This adds not just authenticity but also shows it’s never too late to start or improve your strength journey.
With guidance on setting realistic goals and measuring progress, this book makes sure you’re lifting safely and efficiently. It’s like a roadmap to a stronger, more capable you.
Yoga books often feel like they’re speaking directly to your soul, and ‘Yoga Life’ is no different. This book is all about bringing yoga into everyday life, regardless of your skill level or flexibility.
The beauty of yoga lies in its dual ability to stretch both body and mind. The book offers a straightforward introduction to yoga poses, breaking them down into beginner-friendly sequences. Whether you’re just touching your toes for the first time or refining your downward dog, the step-by-step approach helps you engage at your comfort level.
But it doesn’t stop at just poses. The author weaves in tidbits about mindfulness and breathing techniques, giving readers a more rounded understanding of yoga’s true essence. This insight can help reduce stress and improve focus in daily life, making it not just an exercise guide but a holistic lifestyle companion.
Personal stories pepper the pages, sharing how these practices have transformed readers’ lives physically and mentally. It’s inspiring and underscores that yoga is for everyone, and there’s no need to have perfect poses or fancy mats.
With ‘Yoga Life’, think of each pose as not just a stretch, but a moment to connect with yourself. This book personifies the inclusivity and adaptability of yoga, inviting you to find balance on your mat and beyond.
Find out how adding easy chair workouts to your everyday regimen can provide amazing benefits. Chair workouts offer numerous advantages that can transform your life, ranging from enhanced strength and stability to better circulation and flexibility.
If you follow the right chair workout regimen, you can:
Increase circulation and enhance your general well-being.
Feel nimbler and more adaptable than before.
Change your physique to become more stable and stronger.
Boost your endurance and cardiovascular fitness
Reach your weight loss objectives and lose excess pounds.
Chair exercises are a great way to become in shape for all fitness levels, including novices, experts, and seniors wishing to preserve or improve their mobility and fitness
Movement, Nutrition, Fasting, and The Power of Optimism
Do you ever feel worn out and lack the energy to do the tasks you know need to be done? Do you require additional energy? What if you could “win your battle against Diabetes?” feel better, and acquire more energy and strength?
Discover a number of “common sense” techniques to assist in this book! You will discover important tips that you can put into practice with ease, such as boosting the number of mitochondria (energy producers) in each cell by moving more, standing up at least 32 times a day (by performing squats), increasing your movement every 30 minutes to lose weight, and engaging in strength or resistance training.
A good read that helps you cope with Diabetes.
Wrapping Up
Using a Kindle Scribe to explore fitness and health tips is a smart move because it makes learning effortless, portable, and engaging. With instant access to expert advice, visual guides, and flexible reading options, it turns your downtime into self-improvement time, anywhere, anytime. It’s fitness knowledge at your fingertips.
And if you have more questions, don’t hesitate to ask me or a friend who already uses one!
Steve
Some links on this site may be affiliate links, and if you purchase something through these links, I will make a commission on them.
There will be no extra cost to you and, you could actually save money. Read our full affiliate disclosure here.

 Quick visual guide